This article was originally published in the Journal of Green Building, Volume 9, Number 3, Pages 23-36.
INTRODUCTION
As the first commercial Passive House retrofit in the United States, the Glasswood project demonstrates the potential for high performance, low-load buildings to transform the energy efficiency, occupant experience, and marketability of existing commercial spaces, all at an affordable cost. The owners of this historic building set out to create a restaurant on the ground floor and office space on the second floor that would offer super-efficient energy performance and superior comfort while preserving the structure’s historic character. Embedded in a walkable, transit-rich neighborhood, the project revolutionized the performance of the building while contributing to the vitality of its urban surroundings. Passive House design and construction was by Hammer & Hand, with architectural design by Scott | Edwards Architecture.
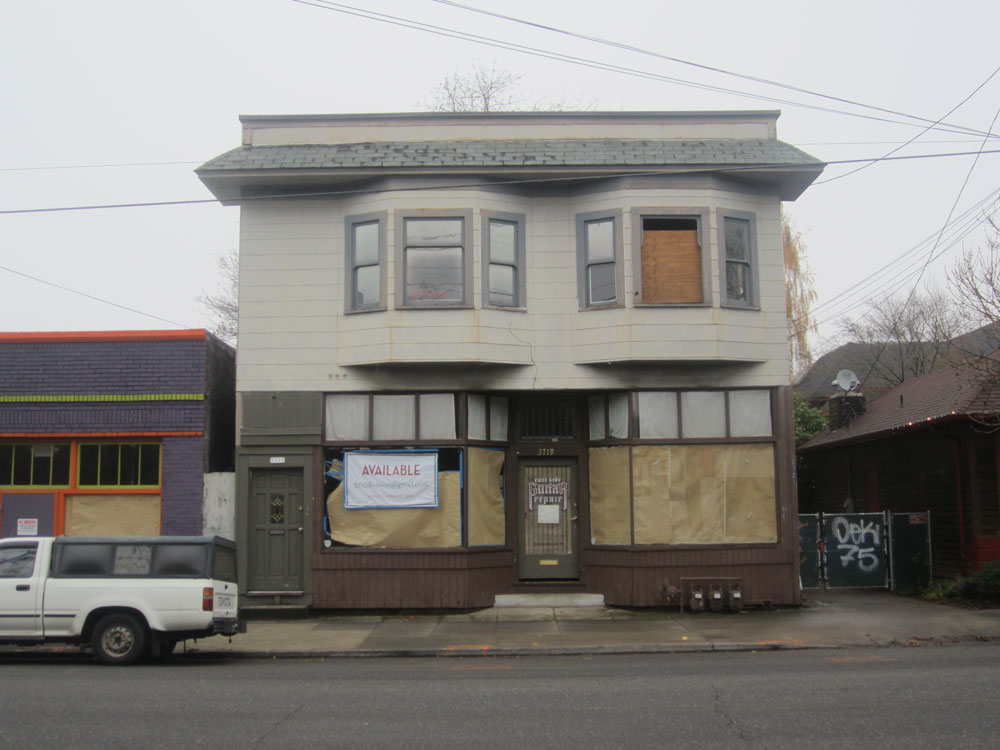
FIGURE 1. The 1916 building before the retrofit.
Context
When the owners purchased the Glasswood building it was a derelict commercial structure (Fig. 1) surrounded by an ongoing urban renaissance of development along Southeast Division Street in Portland, Oregon. Built in 1916, the building had former lives as a barbershop, upholstery shop, guitar repair shop, and apartments. But due to deferred maintenance, the structure had fallen into such a state of disrepair that a major renovation was necessary to save the building from the wrecker’s ball. The owners were committed to adaptive reuse of the structure—repurposing it with a restaurant on the ground floor and office above (Fig. 2).
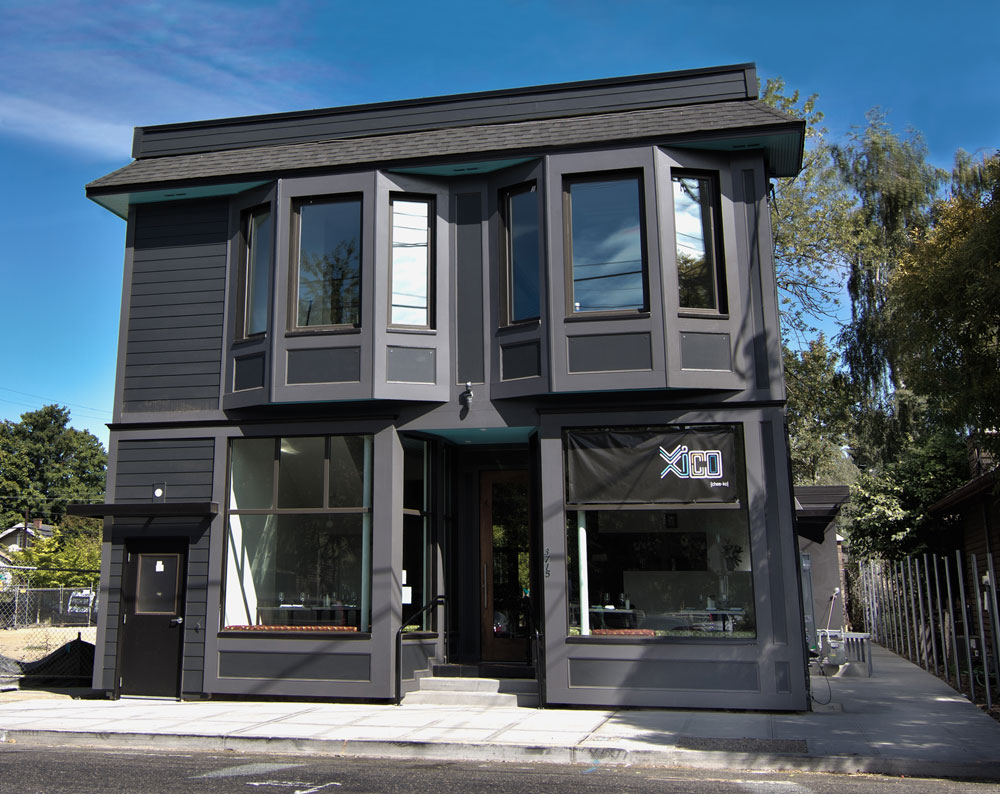
FIGURE 2. The completed retrofit, with restaurant below and Passive House office/event space above.
This occupancy change triggered a full modernization. From the beginning of project development it was clear that the building’s envelope would need to be completely reskinned to allow for required structural upgrades, to make the envelope improvements necessary to meet modern energy code, and to meet the elevated aesthetic norms of a revitalized streetscape. The owners recognized that this reworking of the envelope opened up the opportunity for a cost-effective, high-performance, deep-energy retrofit of the building. In fact, with just a slight increase in the thickness of the new exterior insulation already required by code, a bit of extra attention paid to airtightness, and other modest performance tweaks, the upstairs floor of the project could meet the performance requirements of Passive House, the world’s most stringent building energy standard.
About Passive House
The Passive House approach to construction harnesses advanced building science to achieve transformative gains in building energy performance, reducing buildings’ heating and cooling loads by 80% at nominal extra construction cost. (Visit our Passive House page to learn about H&H’s work in this realm, including project examples, videos, and articles.) The standard’s laser-like focus on energy performance is measured through three metrics:
- Airtightness equal to or better than 0.6 air changes per hour at 50 pascals of pressure, as measured by a blower door fan test.
- Annual heating (and cooling) demand of less than or equal to 4.75 kBtu/sf/yr.
- Primary energy demand of less than or equal to 38.1 kBtu/sf/yr.
If a project meets these three metrics then it can be Passive House certified. Passive House Institute US is the US-based certifier, and offers a third-party verified, quality assured Passive House certification called PHIUS+, which Glasswood earned for its upstairs office space. (NOTE: PHIUS is now working on climate-specific North American Passive House standards.)
Given that significant retrofit interventions were necessary at Glasswood from the beginning of the project, the additional cost to transform the structure into a high performance building was small. At just $6/sf extra, our Passive House retrofit of the 1400sf upstairs space consumes 80% less energy for heating and cooling than a code-built commercial space. Still, retrofitting a 100-year-old mixed-use structure to super-efficiency took significant design work and high performance detailing.
This paper will: (1) identify the Passive House design challenges that the Glasswood project presented; (2) summarize the solutions to those challenges; (3) detail the construction methods employed to complete the project successfully; and (4) detail lessons learned.
I. DESIGN CHALLENGES SUMMARY
How do we, in the 21st century, approach the renovation of historic but inefficient buildings? The fuel burned to operate them speeds global climate change, but bulldozing and rebuilding on any significant scale is not an option—too much architectural heritage and embodied energy wasted. The Glasswood project presented these three primary design challenges: (a) how to retrofit to the Passive House standard on a building with an inherently energy-intensive commercial kitchen; (b) how to transform the performance of the structures while preserving its architecture; and (c) how to design a HVAC strategy that delivers comfort and fresh air in the micro-load context of a Passive House space with highly variable occupancy rates.
a. Separation from the Restaurant
Given the challenge of incorporating a commercial kitchen into a Passive House structure, the critical site solution at the Glasswood retrofit is the adiabatic layer (Fig. 3) that separates the Passive House office space on the upper floor from the high performance (but not Passive House) restaurant (Xico) below. (Due to the intensive energy use and air change requirements of commercial kitchens, restaurants are usually not suitable for Passive House certification.) By treating the horizontal space between the office and restaurant as a partition wall, Hammer & Hand isolated the office as its own self-contained unit. While partially thermally connected with the restaurant below, everything else about the building systems in the office is 100% separated from the ground floor, including air sealing, ventilation, heating and cooling, and domestic hot water. The adiabatic layer made Passive House possible for this structure.
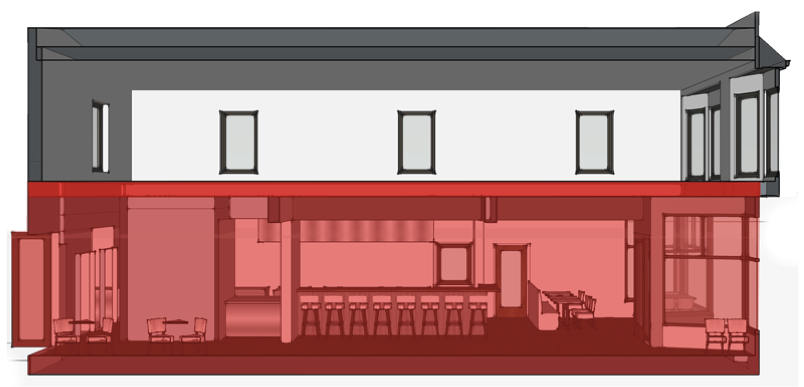
FIGURE 3. An adiabatic layer isolates the Passive House upstairs from the restaurant downstairs.
b. Reusing Existing Shell
In constructing the project’s high performance envelope Hammer & Hand maintained the shell’s existing 2×4 wood framing and added layers inside and out. As part of the project’s seismic retrofit, the team installed new structural exterior sheathing and taped all seams with vapor-permeable tape to create a wind-tightness layer. The R-33 assembly augments the existing 2×4 wall cavity with an inboard 2×4 service cavity, with both cavities filled with high-density cellulose. The assembly is wrapped with 2” EPS foam, exterior gypsum, WRB, and rain screen. The roof insulation is R-45 water-blown low density spray polyurethane (LDSPF) against the underside of the roof system with a sealed interior OSB air tightness layer.
The project employs high performance windows with insulated fiberglass frames and high solar heat gain, triple-pane glazing. Through a process detailed later in this article, Hammer & Hand installed each window using liquid applied flashings. To create seamless air and water tightness, this liquid applied barrier goes into all penetrations and rough openings in the building envelope.
c. Mechanical Simplicity
The mechanical system strategy at Glasswood (Fig. 4) became one of the simplest elements of the project, thanks to the micro-loads of Passive House. The space is ventilated using an 88% efficient Zehnder 550 ComfoAir HRV, controlled by a carbon dioxide sensor that modulates the ventilation rate depending on occupancy. The unit maximizes the cooling potential through night flush ventilation. In this mode the HRV bypasses the heat recovery core and exchanges all the air in the building a number of times with outside air, effectively lowering the temperature inside the building to that of the exterior in cooling demand situations.
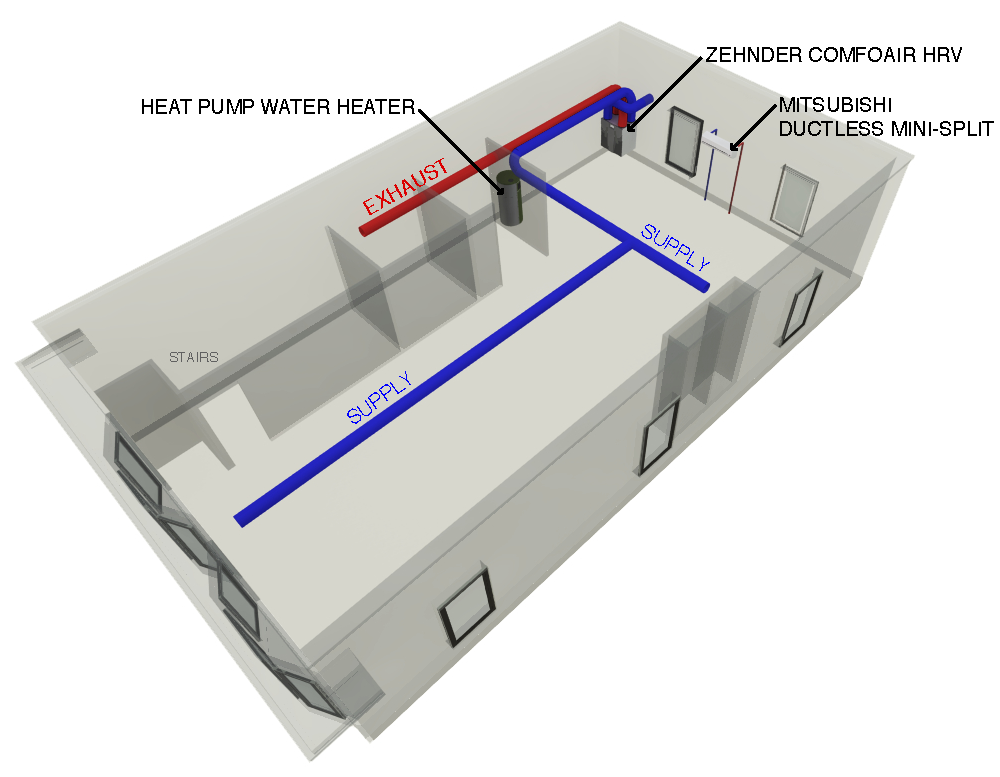
FIGURE 4. Design simplicity of the mechanical system at Glasswood.
A heat pump hot water heater, programmed to run afterhours, provides domestic hot water for the lavatory and kitchenette. During summer months this unit partially offsets the space’s cooling load by pulling heat from the interior air. During winter months the unit switches over to electric resistance heat to avoid cooling the space. Heating and cooling are provided by one Mitsubishi ductless minisplit.
The design at Glasswood incorporates open space, natural light, and high-quality, efficient artificial lighting. The daylighting scheme for the space includes three daylighting zones equipped with sensors that monitor daylight and occupancy so that artificial lighting adjusts automatically to the natural light provided by the space’s large high-performance windows. Initial modeling of conventional lighting systems showed the lighting satisfying the entire heating load during winter and leading to excessive cooling load in summer, so daylighting and use of efficient fixtures were key to the Passive House strategy.
The Result
The project surpassed all three metrics of Passive House certification, with an airtightness measurement of just 0.30 ACH50 (compared to the 0.60 ACH50 required by Passive House), annual heat demand of 4.14 kBtu/sf/yr (compared to the 4.75 kBtu/sf/yr required), and primary energy of 36.9 kBtu/sf/yr (compared to the 38.1 kBtu/sf/yr required).
But Passive House projects not only revolutionize energy efficiency, they also revolutionize the experience of being inside. Glasswood is an airy, quiet, comfortable, fresh-air-infused space (Fig. 5). Although the structure overlooks busy Division Street, the project’s high-performance windows and advanced building envelope shield the interior space from noise outside. And the freshness of interior air is palpable, exposing how accustomed we have become to conventional interior spaces that are stale and oxygen-starved. Energy consumption for heating and cooling is reduced by 80% compared to a conventional commercial space. The addition of a modest solar array could easily bring the project to net positive energy.

FIGURE 5. Interior of the Passive House office/event space.
III. CONSTRUCTION DETAILS
Our examination of the construction of Glasswood, below, is organized into five categories: a. adiabatic layer; b. wall assembly; c. window installation; d. roof assembly; and e. mechanical systems.
a. Adiabatic Layer
The adiabatic layer at Glasswood separates the office and event space upstairs from the restaurant below, a key move in allowing the upstairs space to achieve Passive House certification
given the energy-intensive nature of the commercial kitchen downstairs. Adiabatic layers are employed in energy modeling as a way of recognizing those conditions where the modeled space abuts another thermally conditioned space—circumstances in which we need to air seal between units but do not need to provide the kind of thermal resistance that would be required if the partition were managing exterior air or ground source temperature differentials.
The airtightness of Glasswood’s adiabatic layer is provided by a layer of OSB with taped seams and penetrations. (This approach is also used in Glasswood’s wall assembly, detailed below.) Partially to mitigate for sound and partially to provide thermal resistance, the adiabatic layer is insulated enough to buffer temperature deltas caused by the different occupancies of the two spaces.
b. Wall Assembly
Just as the adiabatic layer made Passive House practical for the project, so too did the approach to its wall assembly (Fig. 6). Because the project involved a change of uses, a significant seismic and thermal upgrade to the structure was already required by code, including the addition of a monolithic layer of exterior insulation. So even before any Passive House considerations were made, the team knew it would be opening up existing walls and recladding the building’s exterior. From both a cost and construction perspective, the conditions were ideal for a Passive House retrofit; fairly simple and inexpensive additions to the wall could bring it up to Passive House levels of performance. The constituent components of this performance are strict, measured airtightness and modeled, highly thermally resistant construction. By preserving the existing exterior wall, the team would be well down the road to preserving the structure’s architectural character and integrity as well.
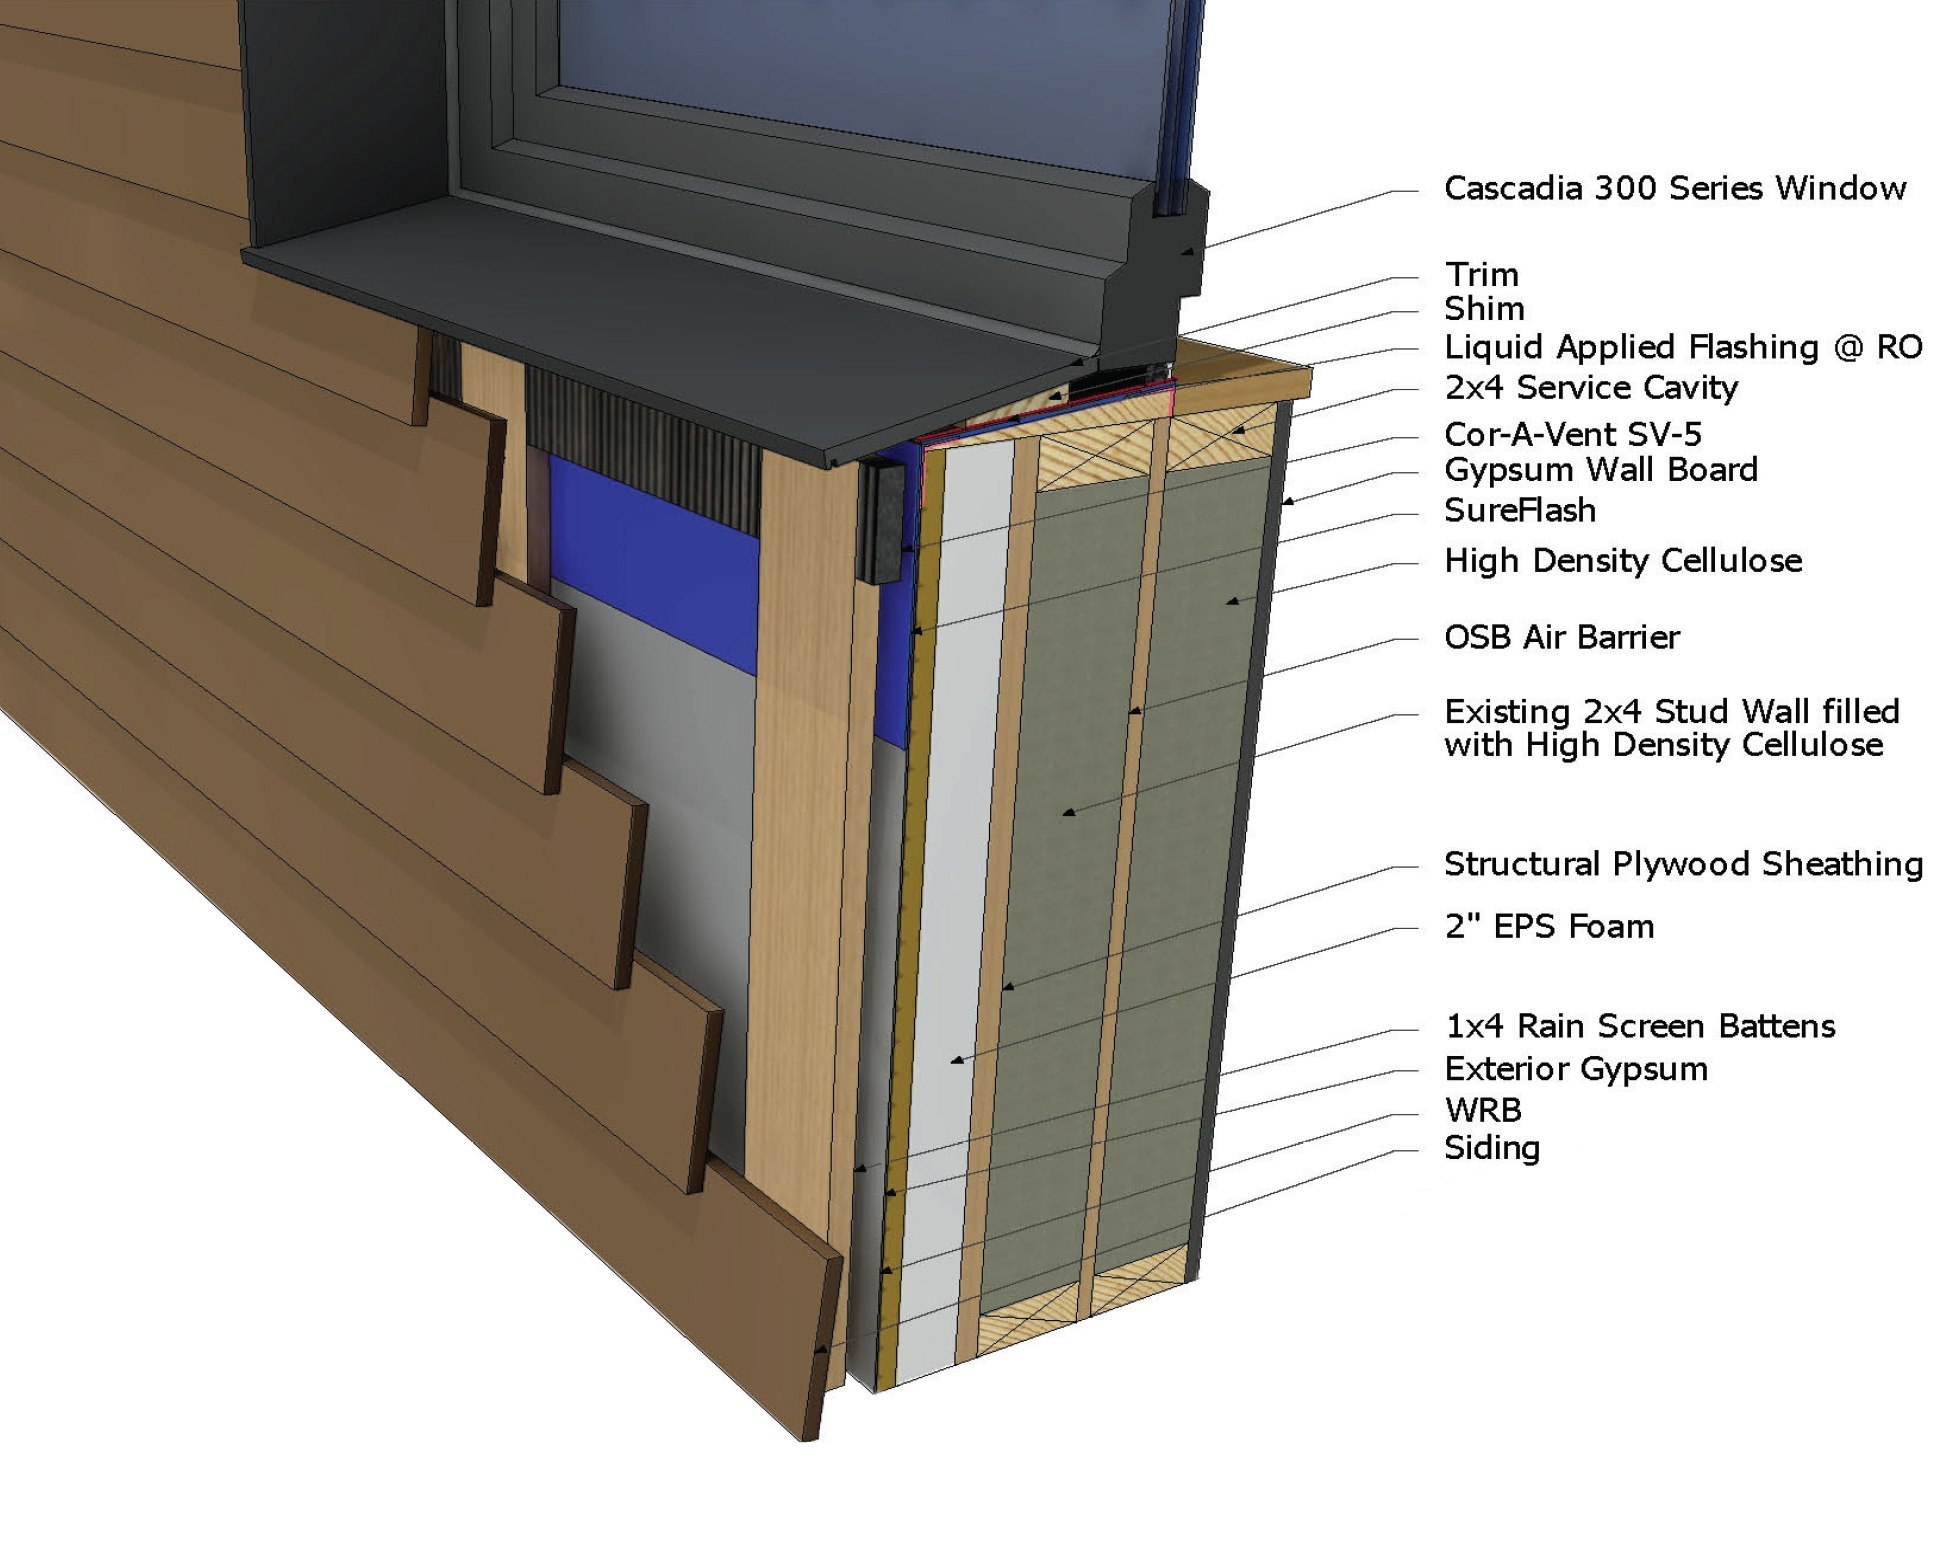
FIGURE 6. High performance wall assembly at Glasswood builds on existing stud wall.
To shore up the shear strength of the structure, Hammer & Hand added a layer of plywood sheathing to the exterior face of the existing 2×4 stud wall. Working outwards from this sheathing, the team layered on continuous EPS insulation followed by a layer each of Densglass, 30-minute paper, rainscreen, and new cladding. Working inwards from the exterior sheathing, Hammer & Hand filled the existing wall cavity with cellulose insulation and then added a new layer of OSB with taped seams and penetrations to create the air barrier (Fig. 7). After confirming appropriate airtightness with a blower door fan test, the team installed a framed service cavity layer, insulated it with cellulose, and finished with a layer of interior gypsum.
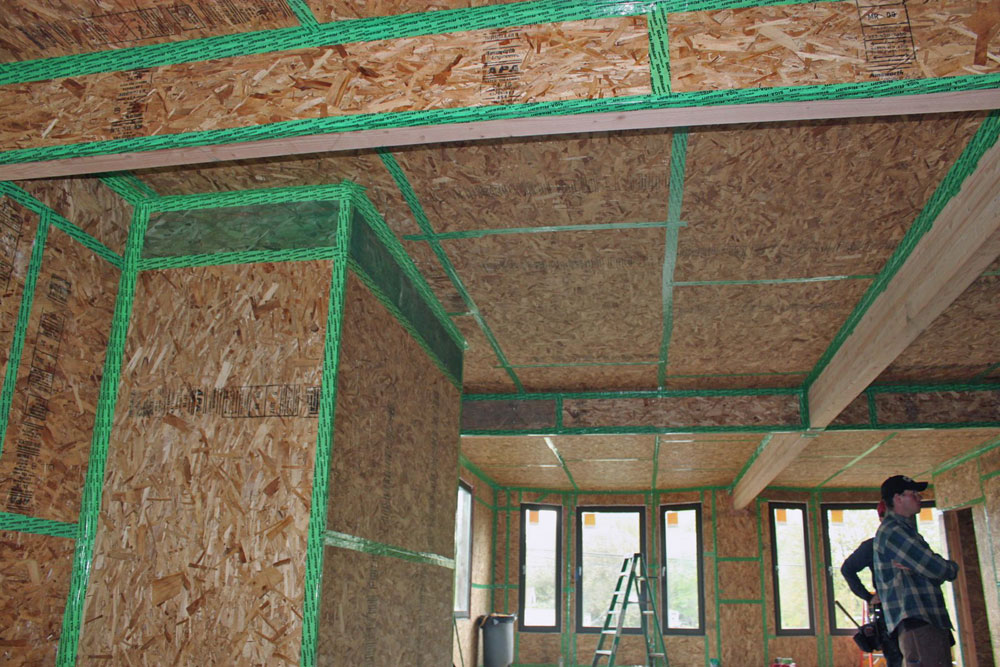
FIGURE 7. Air barrier created by OSB panels taped with vapor permeable Siga tape.
By sandwiching the taped OSB air barrier between the original 2×4 wall and the new 2×4 service cavity, this vital layer of the assembly is protected from puncture or other damage that commonly occurs when the airtightness layer is close to the interior or exterior. The air barrier also offers a consistent level of vapor permeability, as the permeability of the Siga tape used on panel seams equals that of the OSB panels themselves.
For moisture management, the exterior Hardie siding handles bulk water with a 3/4” ventilated rainscreen cavity whose rapid rate of air changes facilitates drying of the assembly. Following Building Science Corporation recommendations, we used Douglas fir furring strips in lieu of pressure treated lumber in order to minimize environmental impact and lower construction material cost. The water-resistive barrier (WRB) is a combination of the Prosoco R-Guard system at punched openings, integrated into a VaporShield membrane installed over the Densglass. This wall will dry primarily to the interior, though it is open to the exterior through the thinner layer of EPS and ventilated rain screen cavity. Interior moistureconditions are monitored through the ventilation system to ensure that vapor is not driven into the assembly from interior spaces.
The exterior cladding is supported by the furring strips as mentioned above. The furring strips are held in place through FastenMaster HeadLOK foam fasteners that act as struts anchored into the structural framing of the original building. These fasteners are specifically developed to stay rigid through a loose layer, such as insulation. This type of fastening of cladding systems through exterior insulation is becoming more common as commercial code increasingly adopts monolithic exterior insulation as part of more stringent energy performance requirements. The 2” of EPS exterior insulation coupled with 7” of dense packed cellulose insulation in the two wall cavities, plus the framing factor, brings the wall assembly to an insulative value of R-33. The wall assembly’s super-insulation and airtightness are both critical to the project’s success at meeting the airtightness and energy demand metrics of Passive House certification.
c. Window Installation
Windows, and their installation, are critical to any Passive House project, as each window opening represents a hole in an otherwise fairly impervious envelope. Each penetration introduces the potential for thermal loss and air and water intrusion. High performance components are key. At Glasswood we used Cascadia 300 series triple pane windows with insulated fiberglass frames and high solar heat gain; an excellent window that gives R-5 in assembly. Like the walls that surround them, these thermally resistant windows, installed in airtight assemblies, were central to the project’s strategy to reach Passive House levels of performance.
Any window is, by nature, failure-prone. They are complex, full of junctions, corners, and seams—rife with opportunity to leak moisture. Although high-quality windows may take decades to fail, it is not a matter of if windows leak, but when. And given that super-insulated, airtight wall assemblies do not dry as readily as the leaky walls of conventional construction, Hammer & Hand realized early on that we had to detail our rough openings to be: (1) completely water-resistant to keep water from penetrating the wall assembly; (2) vapor-permeable to let construction moisture, seasonal moisture fluctuation and exterior moisture evaporate from the wall; and (3) airtight. Airtightness is crucial in high performance construction partly because airtight detailing also helps ensure proper detailing for energy performance and prevention of water intrusion. If you are controlling for air, you are controlling for energy and moisture.
In the Pacific Northwest, the simplest way Hammer & Hand has found to achieve this is through vapor-permeable liquid-applied flashing. Any rain that hits the window opening or leaks through the window drips down to a liquid-applied membrane installed around it into the rough opening (with the window air-sealed to the inside) and out to the exterior moisture-management layer. On the Glasswood project—and most other Hammer & Hand projects—we used a liquid applied flashing system manufactured by Prosoco called Fast Flash.
As an installation method, liquid-applied flashing is as close to foolproof as anything we know. It is much harder for a carpenter having a bad day to make mistakes with a liquid-applied membrane than with the “origami” of tapes, peel and stick, and papers. Window installation sequences using the conventional methodology involve anywhere between 50 and 100 separate steps per opening. The chances of getting every install done perfectly approach zero as you multiply across the number of openings in a typical building. Liquid applied flashing presents not only fewer steps, but also more verifiable results. Errors like inadequate coverage are easy to identify because they are not hidden by layers of tapes and paper. A little spot touching fixes the problem.
Window installation at Glasswood involved four steps:
1. Prepare the rough opening. The first step was to ensure that the rough openings were ready for the install. In this retrofit context Hammer & Hand placed a secondary sloped sill to span the framed sill, exterior EPS, and cladding layers. (Fig. 8) This served both to facilitate drainage outward and to provide a fresh, uniform surface for prep of the rough opening.
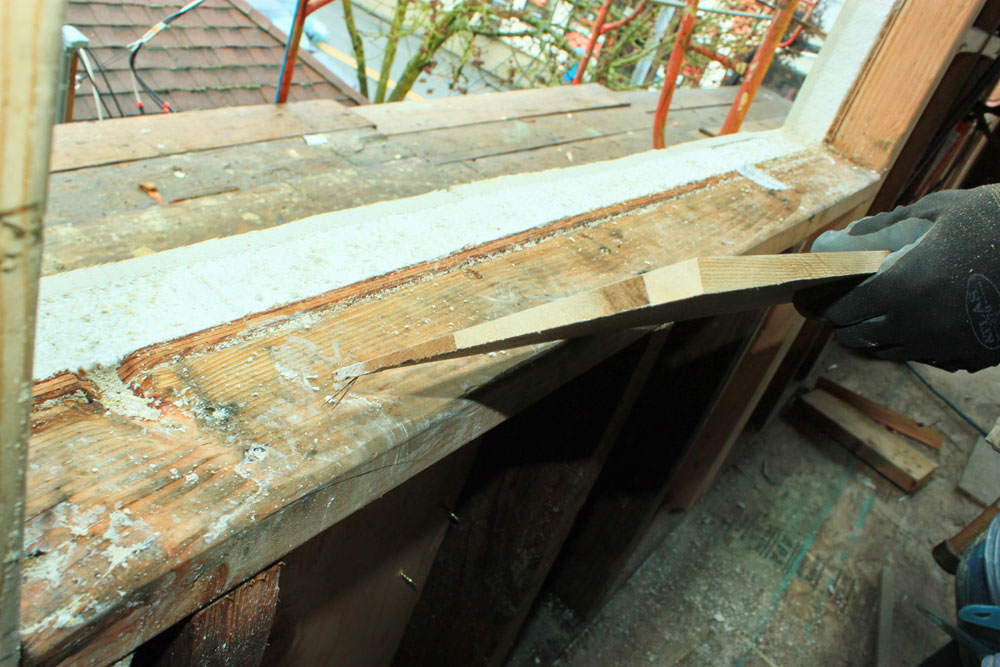
FIGURE 8. Secondary sill being placed to span the framed sill, exterior EPS, and cladding layers.
2. Reinforce structural seams and embed transition membrane. We used a vapor-permeable fluid-applied joint and fastener treatment (Joint & Seam) to coat fastener penetrations and seams between framing, sheathing, the secondary sill, EPS, and Densglas. To tie the rough opening to the building’s exterior moisture management system, Hammer & Hand then embedded sheets of Sure-Flash into the wet Joint & Seam, creating a WRB transition flap under which the exterior sheet WRB can shingle in. (Fig. 9)
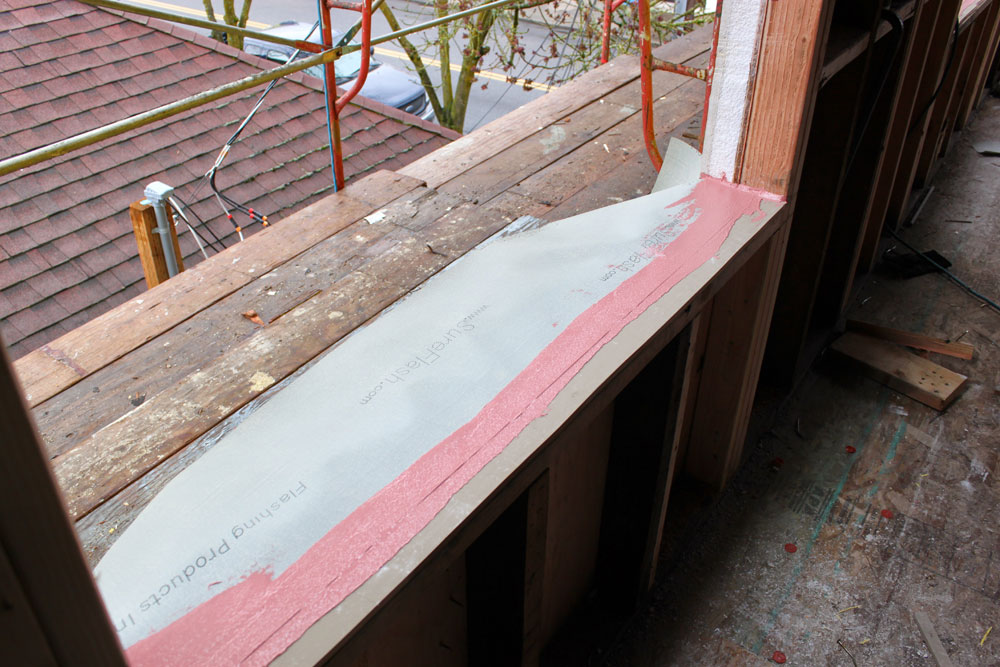
FIGURE 9. Transition membrane embedded in Joint & Seam treatment.
3. Apply liquid flashing. Next Hammer & Hand applied the liquid flashing to the rough opening, careful to create a consistent layer of the product throughout the rough opening. (Fig. 10) The team extended this layer of flashing out onto the face of the building at least 9 inches in all four directions, tying into the building’s water-resistive barrier (WRB) system. (Fig. 11)
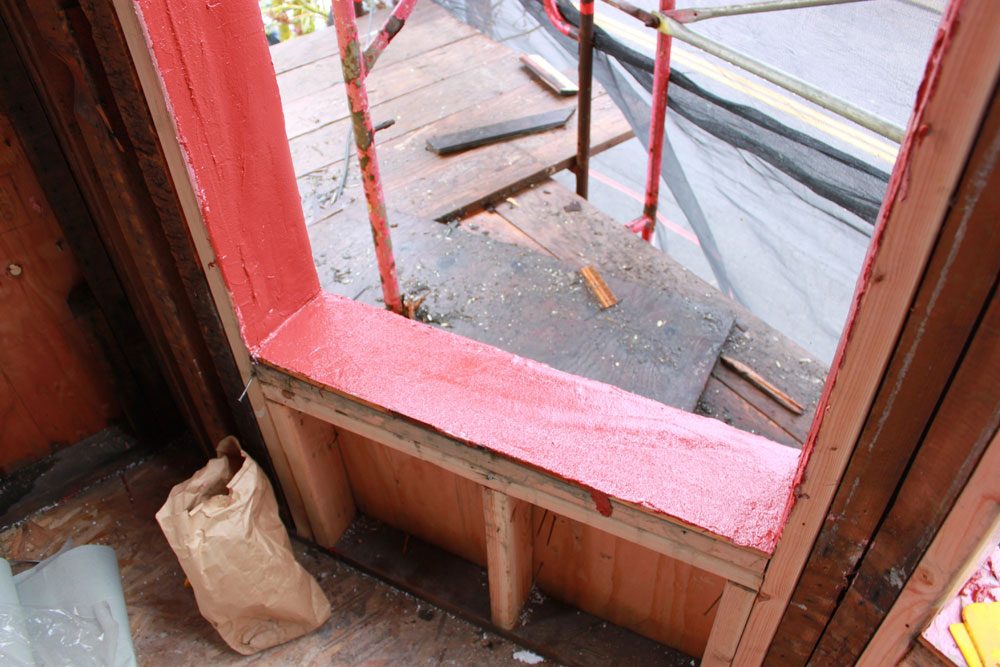
FIGURE 10. Liquid applied flashing applied to rough opening.
There are two reasons for this approach. First, liquid-applied flashing self-gaskets, protecting the integrity of the exterior sheathing immediately around the rough openings, an area that receives lots of fasteners and penetrations. Second, if water does get driven between the exterior sheet goods layer and the liquid-applied flashing, gravity can take over and pull that water down the assembly, where it can be managed by the Sure-Flash transition membrane. Nine inches, based on test chamber results, provides enough horizontal room for wind-driven moisture to be drawn down by gravity, ensuring that water laps out over the WRB system and drains off the building.
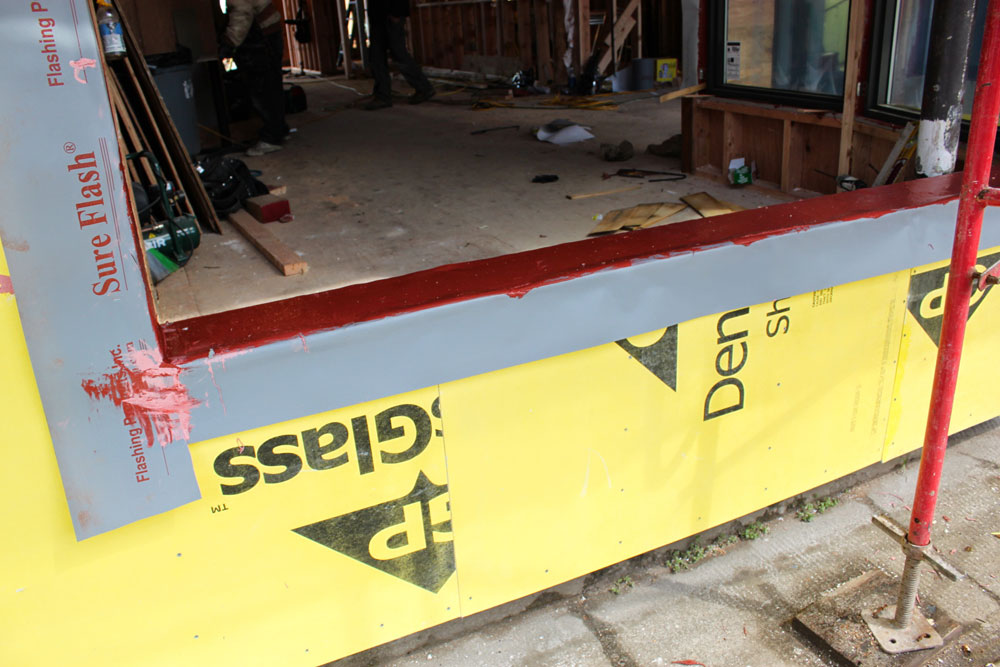
FIGURE 11. Liquid applied flashing extended pas the SureFlash membrane at least nine inches out from rough opening.
4. Install the window. Hammer & Hand placed the windows dead level on setting blocks, with a consistent 3/8” gap between window and opening. The team then installed a closed-cell foam backer rod around the perimeter of that gap and applied a high-quality sealant compatible with the flashing (Air Dam) (Fig. 12).
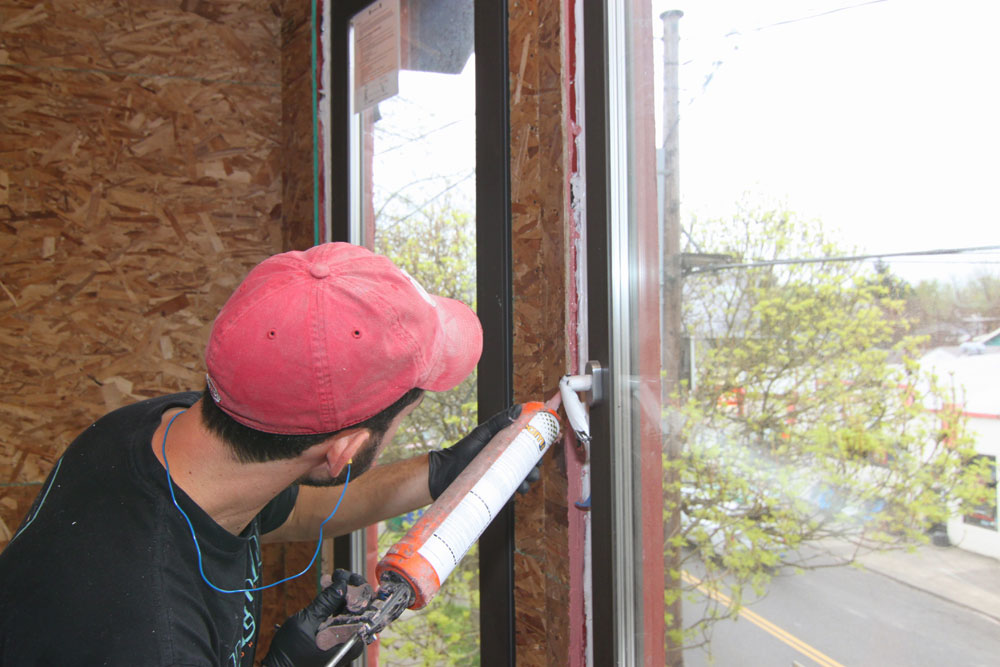
FIGURE 12. Air Dam sealant being applied.
This approach created an airtight, waterproof interior sealant joint, connecting the interior edge of the window with the liquid flashing in the rough opening. Any water that leaks through the window will hit outside that seal and drain to the exterior. Not only does bringing the seal so far to the interior create a last line of defense on the inner plane of the window, but it also is less exposed to temperature extremes and UV light. That seal will outlive the window. (NOTE: For more about our approach to window installation, see our Best Practices Manual.)
d. Roof Assembly
From interior to exterior, the R-45 roof assembly consists of: gypsum suspended on 2×4 furring that functions as a service cavity for lights and wires; the OSB airtightness layer; the existing modified ladder truss framing with low density spray foam insulation sprayed to the bottom side of the original roof sheathing. Continuing outwards is the roof underlayment and a TPO membrane. This is a very low-sloped commercial roof with no venting to the underside of the sheathing. The system relies on the airtight characteristics of the OSB and low-density spray foam to sufficiently prevent and retard vapor transmission and potential condensation at the sheathing. As an integral component of the project’s thermal envelope and air barrier, the roof’s super-insulation and airtightness is essential to Glasswood’s Passive House performance.
e. Mechanical Systems
A Zehnder 550 ComfoAir HRV provides a continuous supply of preconditioned fresh air to the space. Systems like this one are vital to airtight Passive House structures because they deliver superior indoor air quality while also preserving thermal energy inside the envelope. This system’s ventilation rate is controlled by carbon dioxide sensors that modulate fresh airflow based on CO2 levels detected, with manual boosting at the kitchen and bath. When exterior temperatures conditions are right—like on summer nights—the unit automatically bypasses the HRV core and provides direct fresh air to the space.
At Glasswood, the HRV serves three main functions conventionally kept separate: (1) fresh air ventilation; (2) exhaust; and (3) heat and cooling distribution. The unit is set to run at its minimum setting at all times. This provides the space with 0.3 air changes per hour, or approximately one entire volume of air change every three hours. This filtered air is distributed into the open space of the building. The unit’s exhaust intakes are located in the bathroom and kitchen, drawing air from those areas continually with boosts as needed to handle odors and moisture. Given the rate of air changes per hour, the HRV effectively mixes and therefore redistributes the air in the entire space at a rate that provides even thermal distribution on all but the highest demand days.
To meet the project’s micro heating and cooling loads, Glasswood employs a simple ductless minisplit Mitsubishi MSZ-FE18NA, 18,000 Btu/h heat pump. It has three components: (1) an exterior compressor and (2) an interior heating and cooling “head” connected by a (3) line set that carries compressed gas and electrical between the two units. This minisplit heats and, primarily in the case of Glasswood, cools interior air via the head location.
A heat pump hot water heater, slightly thermal positive to interior air temperatures in the winter, provides significant cooling in the summer when it switches to heat pump-only mode, providing about one ton of cooling.
To help Glasswood meet the Passive House standard’s primary energy demand metric, the project employs daylighting, occupancy and photo sensors, and efficient LED lighting to decrease electric consumption for lighting by more than 50% compared to code.
IV. CONCLUSION – LESSONS LEARNED
In adaptive reuse projects that involve the removal of interior finishes and re-skinning the building, there is a golden opportunity to leverage existing codes and, with a small additional cost, increase a building’s shell performance to the point where heat and cooling load are driven toward zero. In the context of commercial Passive House building, cooling load becomes the driving factor even more quickly than is the case in conventional commercial construction, as the heat load is almost always satisfied by operation and occupant inputs.
The payback for these additional costs is anywhere between 3 and 7 years, including the expense of alternative energy systems. By emphasizing energy conservation first through a high performance shell and mechanical system, Glasswood is also well on its way to net positive energy. On-site energy generation via a modest solar PV array is all that is needed to get there.
We realized that in this low load project, the difference between the space’s regular occupancy of 8 people and occasional occupancy of 70 people yielded even more radical results than would be found in a conventional building. Fortunately we installed a much larger HRV than was necessary for the lower occupancy rates, which helps to provide necessary fresh air for large groups. Even with this consideration, in high-use situations the occupants often open the windows to provide additional fresh air and ventilation. But that is fine; open windows are a perfectly acceptable passive cooling and ventilation strategy in Passive House buildings.
Because the occupants of Glasswood have become acclimated to the very small interior temperature differentials of Passive House buildings (plus or minus 2 degrees Fahrenheit from the warmest to coldest spot in the space,) they have become more sensitive than most to larger differentials. So they noticed the slight, 5 to 7 degree Fahrenheit overheating caused by solar gain through the south-facing windows during spring and fall. Hammer & Hand fixed the issue cheaply and effectively with seasonal application of insect screens on the south facing windows, a low-tech way to reduce insolation into the space. But this temperature differential would not normally even be addressed in a conventional structure. It became a nuisance for the occupants at Glasswood because they had become accustomed to even thermal comfort. The same is true of exterior noise. An open window is much more apparent to occupants that are accustomed to working in a relatively silent environment. Street noise is perceived as much louder in this Passive House space with a window open than in an already-noisy conventional structure.
Back to Field Notes