This paper, published as part of the 9th Annual North American Passive House Conference next week, shares the evolution of Hammer & Hand’s wood-framed Passive House envelopes in the Pacific Northwest. Drawing on six projects built in Portland and Seattle over the past four years, I will examine how each of five wall assemblies approached performance, cost, land-use, and durability. The case studies will also chart Hammer & Hand’s move toward developing details that are more familiar to the building community and easy to assemble, moving from unique to common practice. They include:
- Courtland Place Passive House – a fun carpenter’s puzzle with minimal budget
- Glasswood Commercial PH Retrofit – Passive House retrofit of a commercial building
- Karuna House – a high design, high performance showcase
- Maple Leaf Passive House and Puget Passive House – move more toward standard practice
- Pumpkin Ridge Passive House – “Let’s do all cellulose!”
The Five Wall Assemblies
1. Courtland Place – a carpenter’s puzzle with minimal budget
Project Priorities: This personal project of Hammer & Hand’s Dan Whitmore focused on achieving Passive House with a small budget, using readily available materials and the strengths of the building team to realize complex carpentry details.
Courtland Place wall assembly:
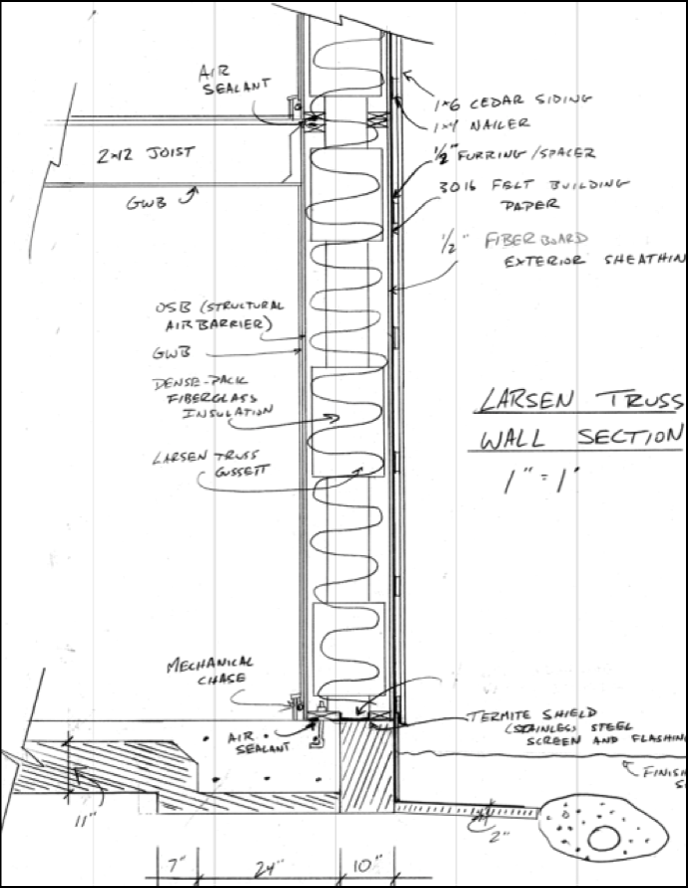
Wall Structure: This house sits atop an insulated slab-on-grade, with the wall cantilevered out to meet the exterior edge of the perimeter EPS and minimize thermal bridging at the foundation wall intersection. Dan used a wall truss whose interior cord bears the structural load and shear of the building. Like a Larsen truss, the exterior cord carries the façade of the building and establishes the insulation cavity.
Air Barrier: The shear panels (OSB) at the inside face of the wall truss form the whole building air barrier, with panel junctions sealed with tape and sealants. (Note: placing the air barrier in this exposed location left it prone to damage from occupants. Though it saved on construction cost, Dan does not recommend the strategy to others.)
Moisture Management: Bulk water is addressed at the cladding with a true ventilated rain screen and WRB over a highly permeable Homasote exterior sheathing. While diffusion can go in either direction, the wall is mostly vapor open to the exterior.
Insulation: 14” deep, dense-packed fiberglass, completed in one pass.
Adaptability: This wall assembly is easily adapted to meet the specific performance requirements of any given project. Alter the dimension of the gusset spanning one cord to the next to change depth of insulation.
Cost: As this project enjoyed very low costs for skilled labor (Dan’s sweat equity as a personal project) it biased toward labor-intensive solutions over moderate- to high-cost materials in order to meet its budgetary targets. For our typical client, this would not have been an appropriate balance.
Land Use: While this wall is fairly thick, choosing dense packed fiberglass over cellulose helped reduce wall thickness by 2 inches. In the end the wall has a moderate impact on the footprint of the building.
2. Glasswood – Passive House retrofit of commercial building
Project Priorities: As a retrofit of a 100-year-old commercial structure this project, like Courtland Place above, was unique for us. Our goals were to reuse and reinforce the existing structure and achieve Passive House certification on a tight lot (and therefore with minimal added material outboard of the original wall face).
Glasswood wall assembly:
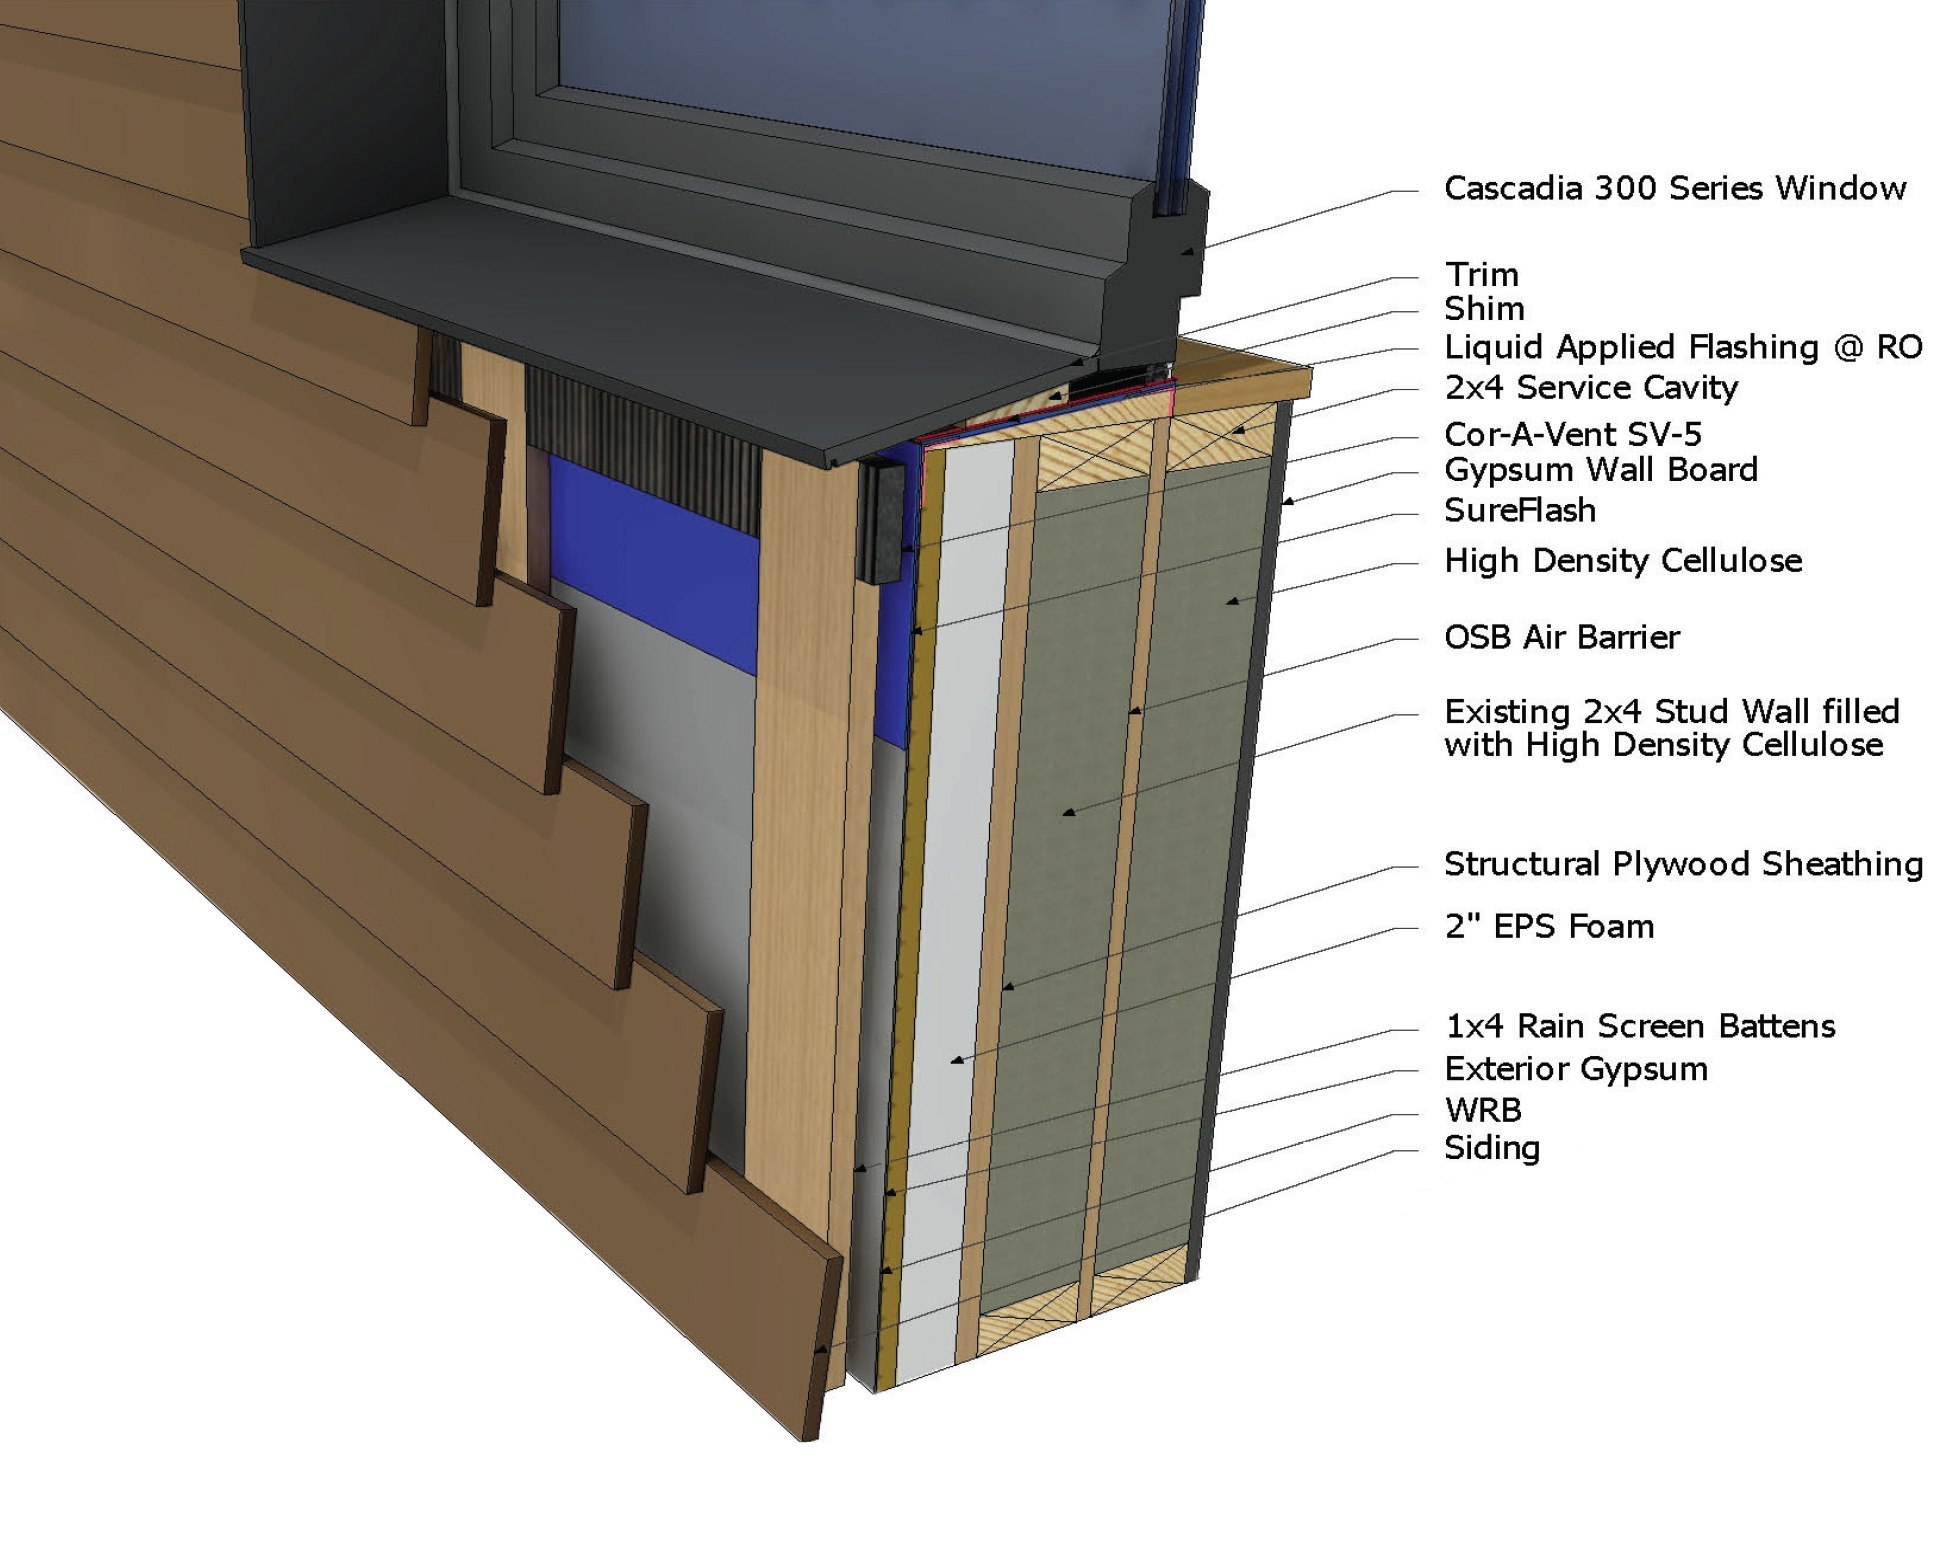 Wall Structure: We added shear panels to the exterior and a secondary interior framed wall for additional insulation. To meet fire code we installed DensGlass exterior gypsum sheathing over the layer of rigid exterior insulation.
Air Barrier: The secondary sheathing layer on the interior face of existing wall, taped at all panel edges, serves as the air barrier. It connects to the same material across the floor and across the ceiling to form a continuous center-of-the-wall air barrier. This air barrier layer is sandwiched between two 2×4 walls, both insulated with high-density cellulose. The interior 2×4 layer acts as a service cavity. The outboard 2×4 layer is the original wall and serves as the structure.
Moisture Management: Exterior Hardie siding handles bulk water with a ¾” ventilated rainscreen cavity. Per Building Science Corporation recommendations, we used Douglas Fir furring strips in lieu of pressure treated lumber in order to minimize environmental impact and construction cost. The WRB is a combination of the Prosoco R-Guard system at punched openings, integrated into a VaporShield membrane installed over the DensGlass. This wall will mostly dry to the interior, though it is open to the exterior through the thinner layer of EPS and ventilated rain screen cavity. Interior moisture conditions are monitored through the ventilation system to ensure that vapor is not driven into the assembly from interior spaces.
Insulation: 2” of EPS exterior insulation, with 7” of dense packed cellulose in the two wall cavities. This was a compromise. We originally planned for two inches of high-density mineral wool, however the municipality was not comfortable with their information on this product’s fire rating.
Cost: Because this was part of a full building retrofit that involved bringing an historic building up to commercial code, the added expense of reaching Passive House was nominal.
Land Use: Due to the tight site, the 2” of EPS exterior to the existing wall, and 7” of cellulose inside the wall, made Passive House performance possible without increasing building footprint appreciably.
3. Karuna House – a high design, high performance showcase
Project Priorities: Making a beautiful and complex design perform as a Passive House.
Karuna wall assembly:
 Wall Structure: A standard 2×6 stick framed wall is integrated into a larger steel structural skeleton. Due to the structural requirements of the exterior stucco cladding, the engineer required a z-joist detail to transfer the load across the 6 inches of exterior polyiso insulation. This z-joist assembly carries through to areas where the house is clad in cedar, as well.
Air Barrier: Exterior sheathing is coated in Prosoco R-Guard system to create the home’s air barrier.
Moisture Management: Bulk water is handled by a combination of cedar and stucco claddings with rain screen cavities. The WRB is provided by the foil-faced exterior insulation, taped at all seams. The Prosoco system provides a secondary layer of bulk water protection of the structure. Drying capacity is to the interior.
Insulation: 6 inches foil-faced polyiso wraps the building. 5.5 inches of dense packed cellulose forms the thermal layer inside the 2×6 wall cavity.
Cost: This was not a budget driven project, though the Passive House “intervention” had to be cost-effective. In the end, making the home perform as a Passive House cost less than 2% of the project budget.
Land Use: Footprint of the house was not a concern. That said, wall thickness is just moderate.
4. Maple Leaf and Puget – move more toward standard practice
Project(s) Priorities: To use standard materials and established trade practices in building cost-effective Passive House wall systems.
Maple Leaf wall assembly:
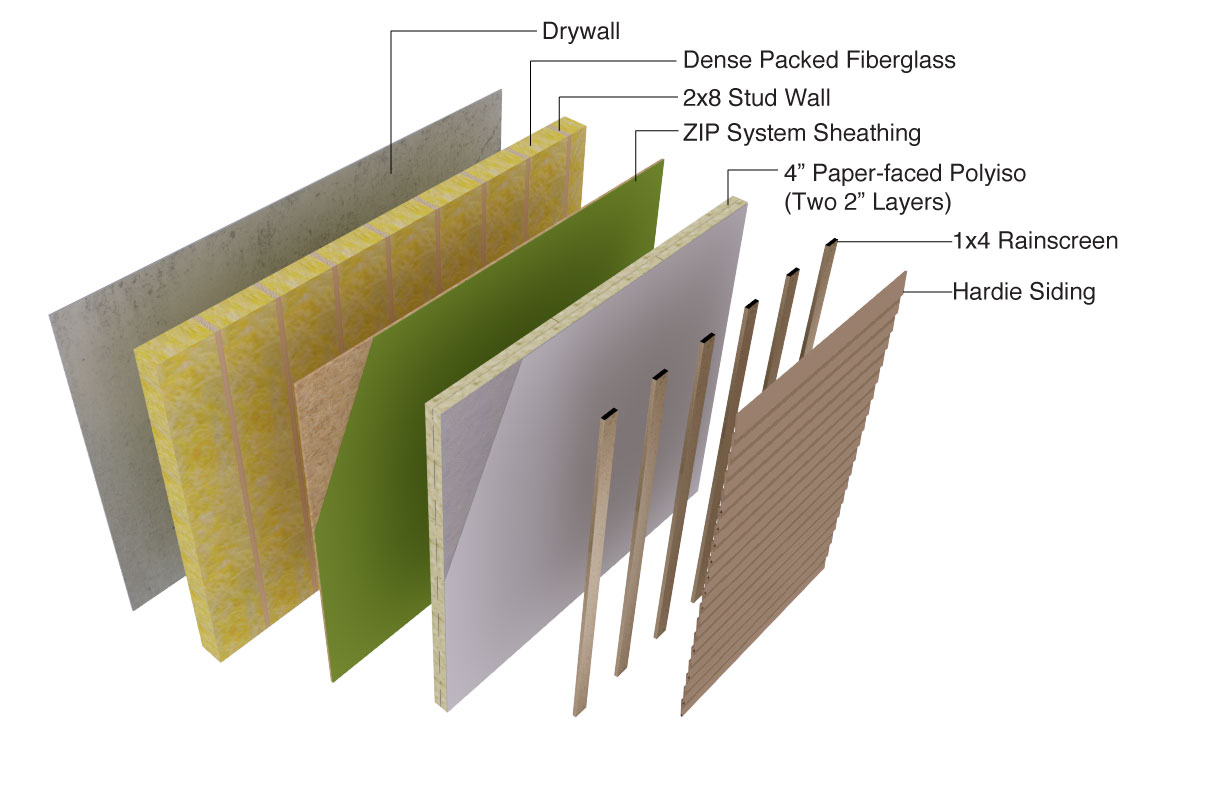
Puget wall assembly:
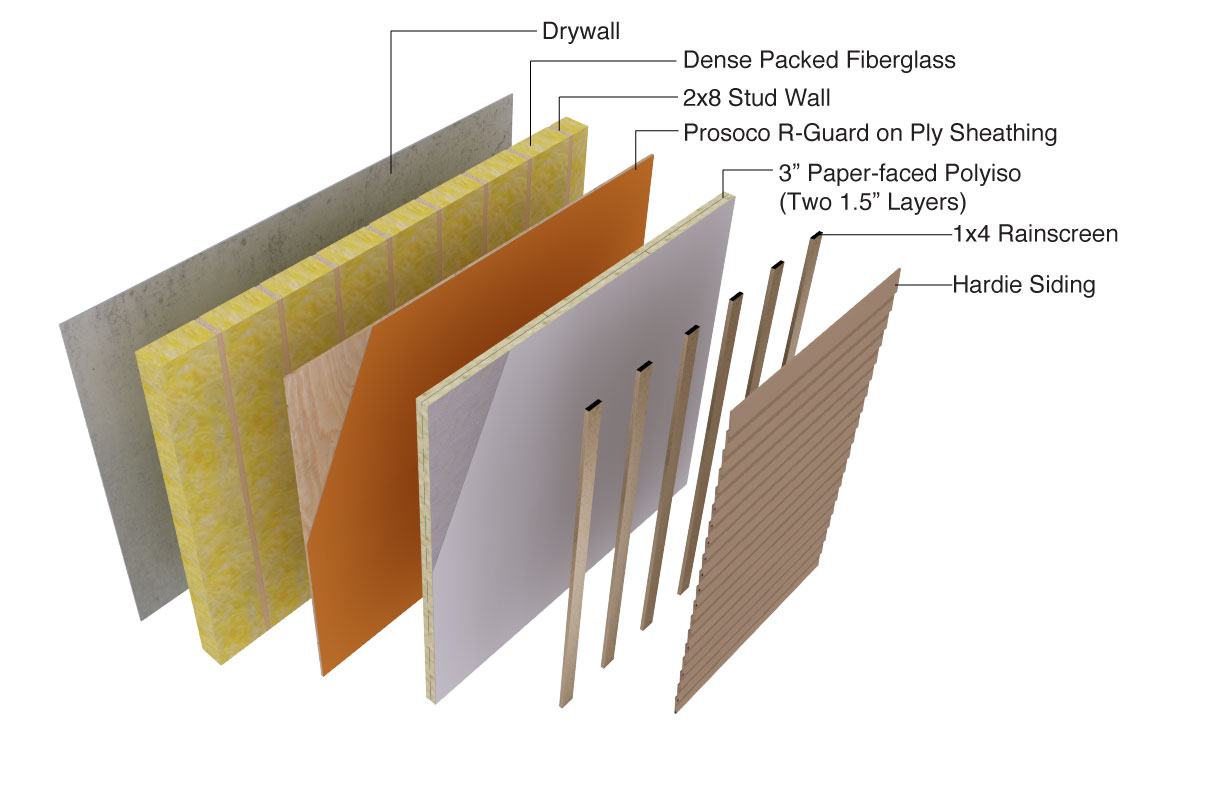 Wall Structure: For both projects, we used a 2×8 stud wall in order to establish a thicker wall cavity without the additional labor involved with a double-stud wall application.
Air Barrier: Structural sheathing, sealed at panel edges, forms the home’s air barrier. Due to field experience, we moved to Prosoco liquid applied sealant in lieu of tape.
Moisture Management: In both homes’ wall systems we installed fiber cement siding over a 3/4” ventilated rainscreen cavity. A membrane establishes the WRB over the rigid exterior insulation. At the exterior sheathing layer a secondary WRB protects the structure. In Puget Passive House we established this secondary WRB using Prosoco R-Guard. Due to lower exposure and budget constraints, we used ZIP Sheathing with its integrated WRB to establish the secondary WRB at Maple Leaf Passive House. The exterior rigid insulation (paper-faced polyiso) has a vapor open covering, so vapor can move out to the ventilated rainscreen cavity or to the interior of the building.
Insulation: Paper-faced polyiso exterior insulation wraps each building (3” at Puget and 4” at Maple Leaf). 7.25” dense packed fiberglass insulation forms an additional thermal layer inside the stud wall cavity.
Cost: The additional cost of exterior insulation, and the lengthy fasteners therefore needed for the siding assembly, was moderate. Time to build the assembly, and therefore labor cost, closely tracks standard construction.
Land Use: With the higher performing R-value of the exterior polyiso, these assemblies have shaved a few valuable inches off wall thickness and building footprint, an important “win” in their urban settings.
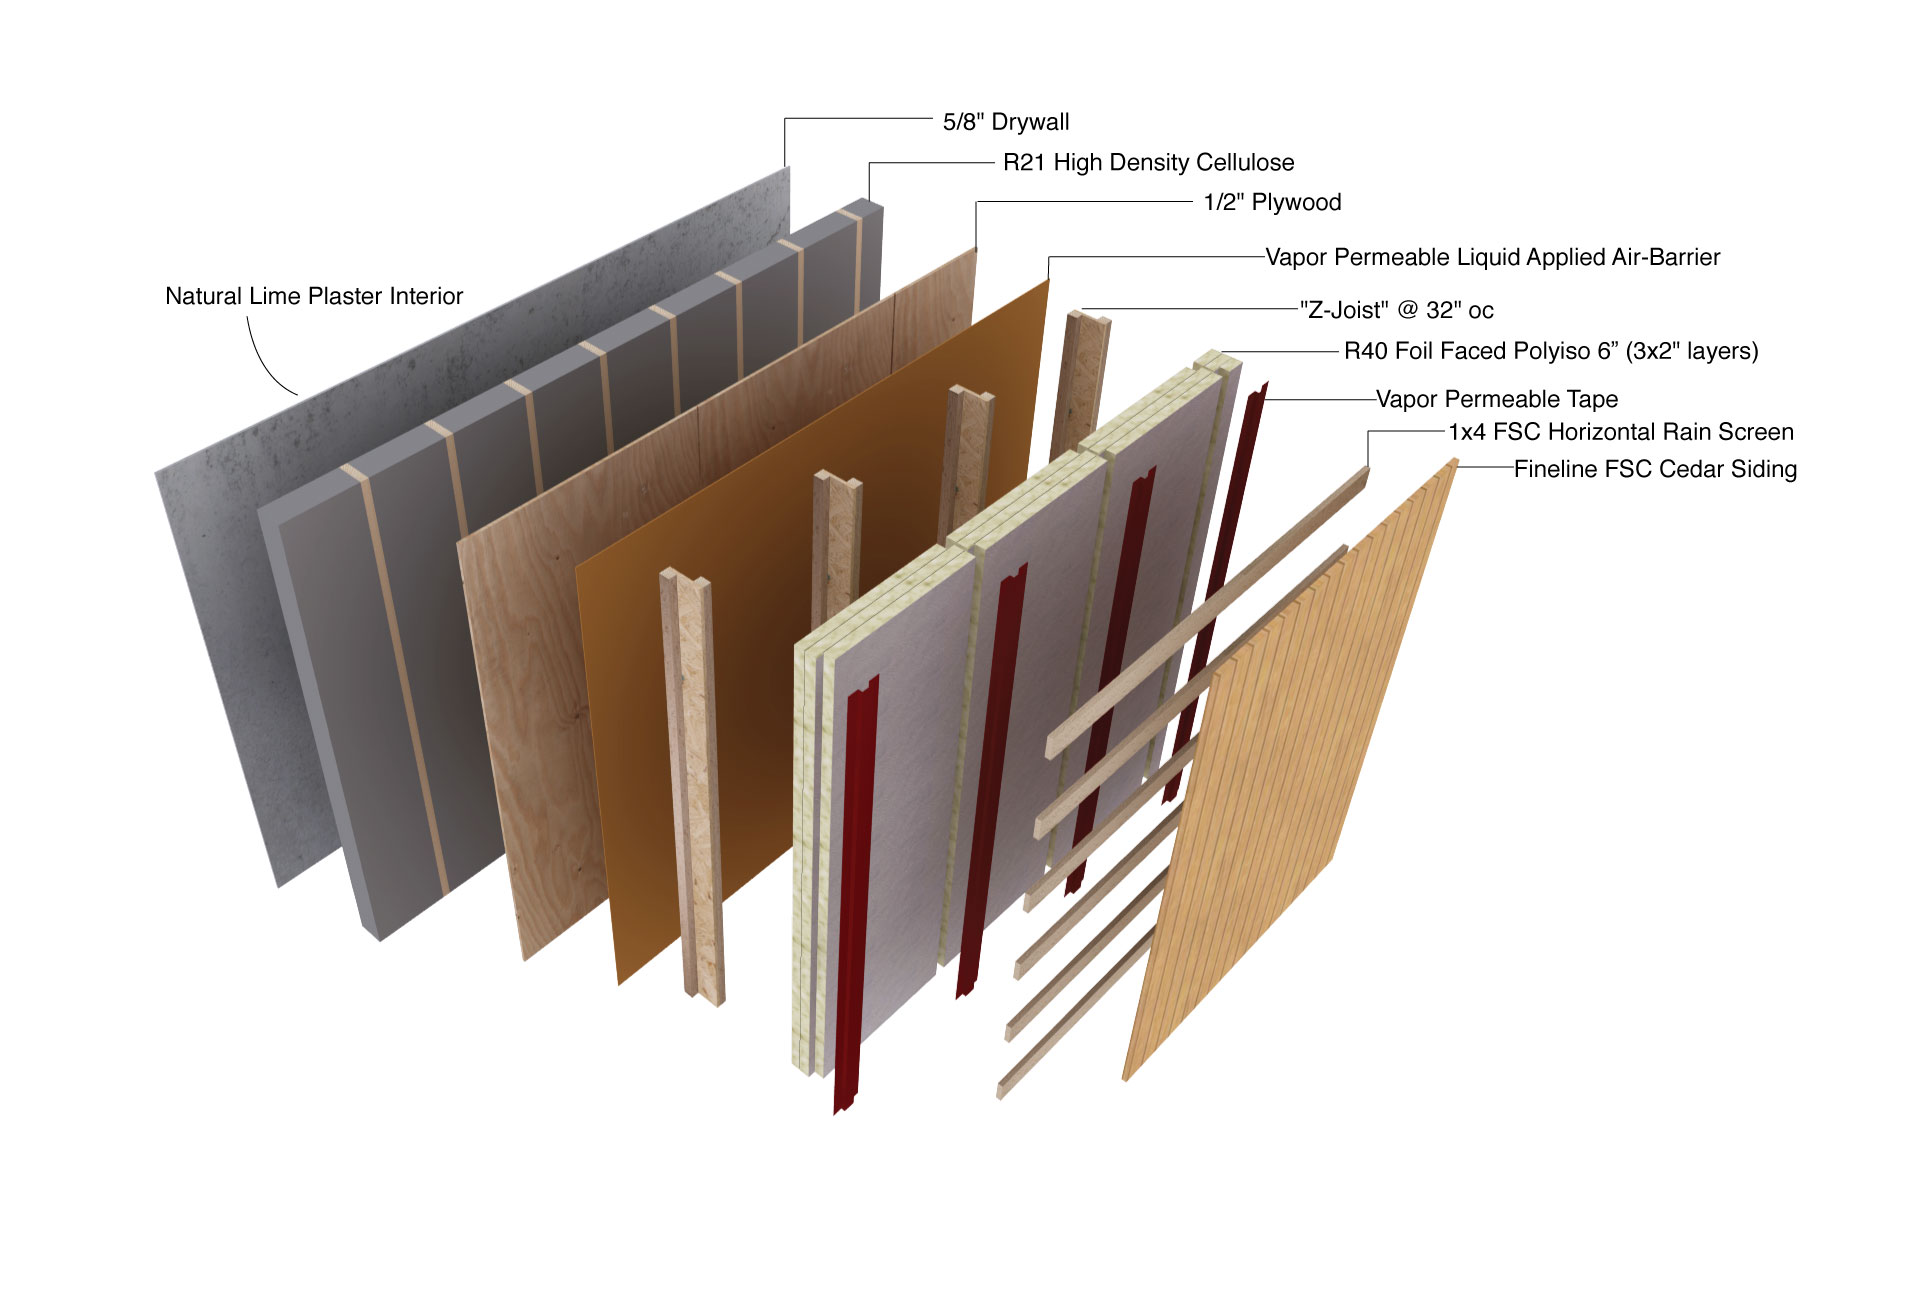
5. Pumpkin Ridge – “Let’s do all cellulose!”
Project Priority: For the wall at Pumpkin Ridge Passive House we set out to do a low-embodied energy insulation package, partly to offset the GWP impact of the EPS required in the foundation (necessary to handle sloped site conditions). We were also committed to keep costs low enough that client utility bill savings could pay for any added mortgage service due to those high performance building costs.
Pumpkin Ridge wall assembly:
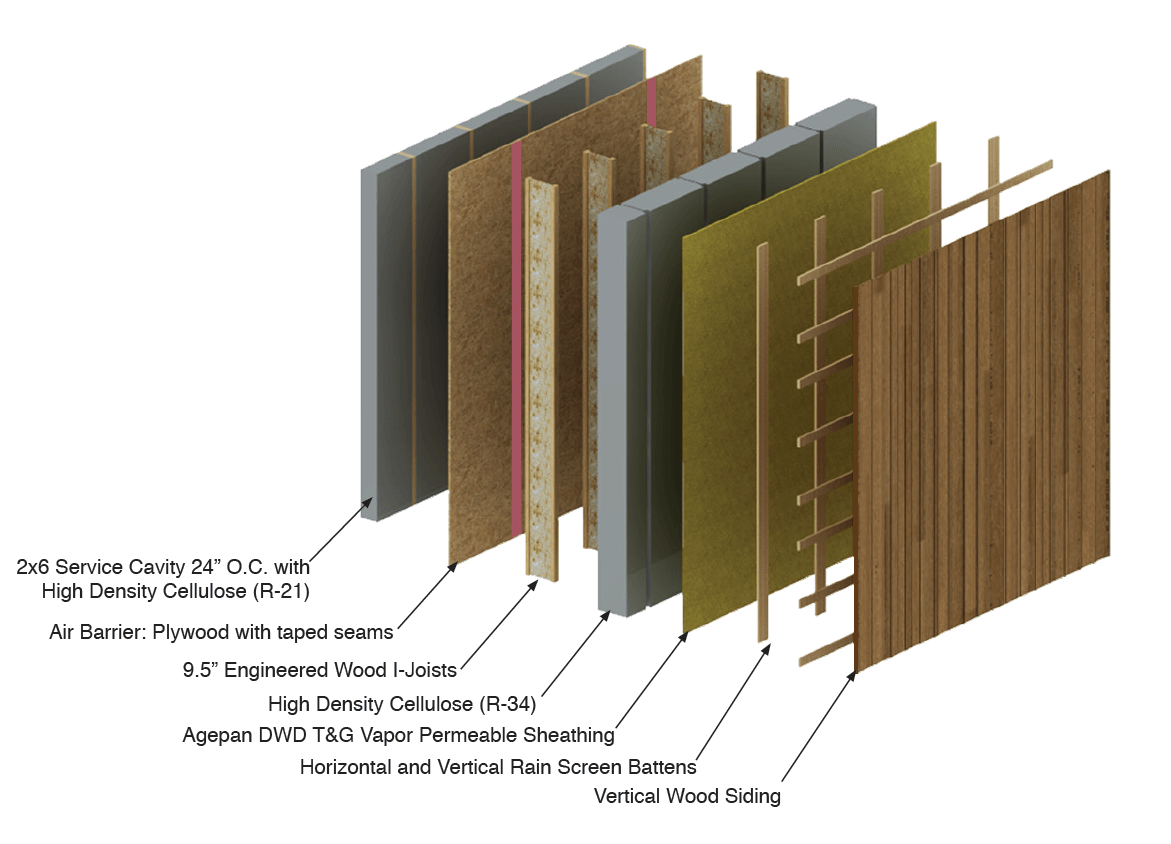 Wall Structure: We used standard 2×6 wall framing with a Larsen truss system using I-joists. The outer exterior sheathing layer uses Agepan fiberboard.
Air Barrier: The air barrier was easily established at the sheathing layer with liquid applied membrane at seams.
Moisture Management: Bulk water is managed with exterior cedar cladding over a 3/4” ventilated rainscreen cavity. The WRB is provided by the wax impregnated Agepan sheathing. As a cellulose-based, open diffusion wall, vapor can readily leave the assembly in either direction.
Insulation: With a total of 15” of blown-in cellulose in the 9.5” Larsen truss cavity and the 5.5” interior stud bay, the building boasts a very robust, low-embodied energy thermal envelope.
Cost: The ease of installing the I-joist and Agepan combination (and lower labor cost) mitigated the potential complexity of the Larsen truss application and the material costs of the I-joist and Agepan.
Land Use: Land use was not an issue due to the large site, which allowed for a thick wall.
Summary of Wall Assemblies by Approach
Air Barrier
- Sheet goods with tape: Glasswood, Courtland Place
- Sheet goods, plywood or OSB with liquid applied membrane at seams: Pumpkin Ridge, Maple Leaf
- Liquid applied membrane applied as continuous layer: Karuna, Puget
Moisture Management – Bulk
- Liquid applied membrane applied as continuous layer: Karuna, Puget
- Liquid applied membrane at punched openings with integrated membrane WRB: Glasswood, Courtland Place
- Treated sheet good (Agepan) with liquid applied membrane at punched openings: Pumpkin Ridge
Insulation
- Cellulose cavity fill with exterior foam: Glasswood, Karuna
- Dense fiberglass with exterior foam: Puget, Maple Leaf
- Larsen Truss with cellulose: Pumpkin Ridge
- Wall truss with dense blown fiberglass: Courtland Place
Conclusion: client preferences, site constraints, buildability
In reflecting on our approaches to these different wall assemblies, it is clear that the primary driver of design and construction decisions for Hammer & Hand continues to be client preference and site constraints. However, buildability in terms of time, money, and resilience will always be an important consideration, and may be the most important one for others.
If the client prefers a building with the lowest embodied energy possible, then stick-framed, exterior Larsen trusses with TJIs, Agepan sheathing, and blown-in cellulose insulation is a fantastic solution.
If, however, the project sits on a compact site and is bumping up against zoning restrictions, then the higher performing, and therefore thinner, exterior insulation options (like polyisocyanurate) become a better choice.
The buildability of each of these wall sections may differ from one practitioner to another. It is important to do a back-of-the-envelope parametric analysis of all the above factors, including climate, to determine what the best wall assembly is for each project. The power of a performance-based building energy standard is that it allows the designer/architect and builder freedom to value optimize the assembly taking into account all these factors.
As the industry moves toward monolithic exterior rigid insulation in general, it’s a simple process to just thicken up that exterior layer a bit. Both Maple Leaf Passive House and Puget Passive House are good examples of this approach.
Back to Field Notes