We review Karuna House progress in this video essay about the Passive House, Minergie, and LEED Platinum project.
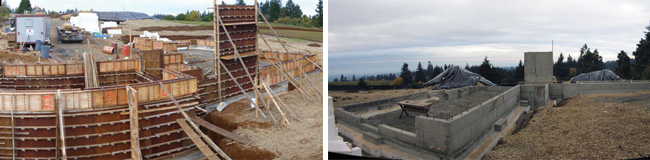
It’s official! The first phase of Karuna House construction is complete: the Passive House/Minergie-P-ECO-friendly foundation is laid, the stem walls are up and we’re ready for framing. Out of the dirt!
The Karuna House, designed by Holst Architecture and built by Hammer & Hand, was conceived as a national green building case study by the project’s client. (See this introductory post about the project.) The team is pursuing Passive House, Minergie-P-ECO, and LEED for Homes Platinum certifications for the home. (See this post about the effort to achieve all three demanding certifications in one project.)
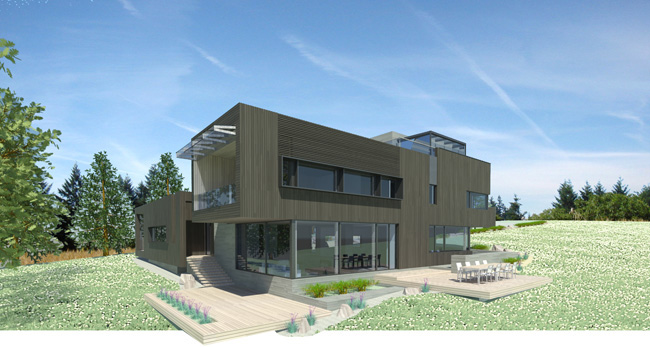
Rendering of the Karuna House, courtesy of Holst Architecture.
Throughout the construction process, Hammer & Hand’s Skylar Swinford and Scott Gunter have been busy shooting a series of videos to explain the building details and strategies employed to construct this high performance home. Now that we’re closing the first chapter of construction, I thought it’d be helpful to pull together those videos, as well as site photos by Shelley Martin, into a quick summary of what we’ve accomplished at Karuna so far.
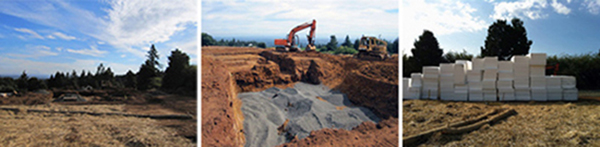
LEED-compliant straw erosion control (l), basement excavation (c), and EPS foam delivered (r)
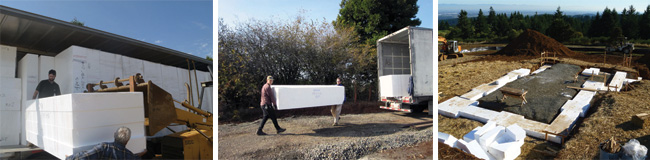
Geofoam Foundation Installation
Once excavation was complete, our first step was to lay the EPS (expanded polystyrene) geofoam foundation layer to insulate the concrete footings and slab from the ground. A key principle of Passive House and Minergie-P is to “super-insulate” all six sides of the building envelope. In this first video Scott talks through the steps our team took to prepare the foam layer.
These photos (below) show the pre-cut pieces of EPS being unloaded from the truck, and then placed.
Foundation Footings
The team then poured the foundation footings directly on top of the layer of geofoam. In this next video Scott points out the black capillary break material that coats the top of the footings to block moisture transfer up into the foundation stem walls. He also shows how the team will precisely align the wall forms.
These photos (below) show the various footing treatments across the site, all prepped with the capillary break material across the top.
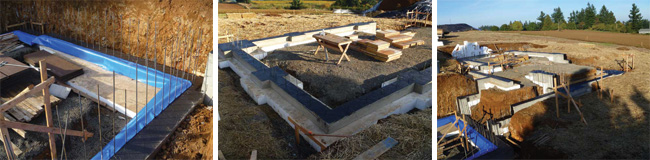
Basement Foundation Walls
In this next video, Scott walks us through the layers of the foundation wall, from ¾-minus compacted gravel, to 8″ EPS foam, to concrete footing, to capillary break, to 15 mil poly vapor barrier, and finally the concrete stem wall. The blue vapor barrier material is centered on top of the footing and embedded into the wall as the stem wall is poured atop it.
These shots below show the standard concrete form construction on the left, and then the finished product on the right. This LEED and Minergie-ECO-friendly concrete contains 30% fly ash and locally-sourced aggregate. See the post “Karuna House’s concrete on foam: Passive House innovation and simplicity” for more about the concrete work.
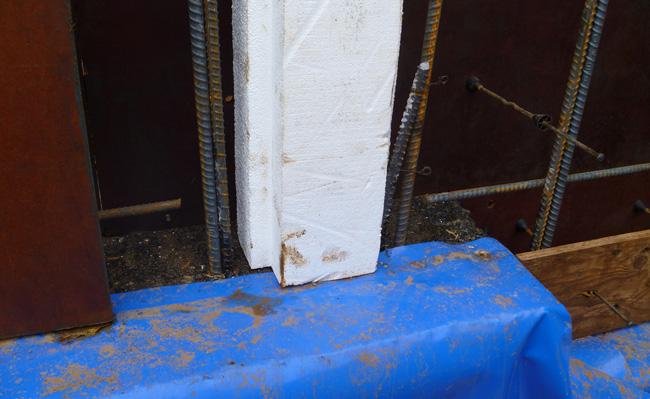
Basement Thermal Breaks
Thermal bridges – bad. Thermal breaks – good. Thermal bridges are elements in a structure that allow heat to transfer between conditioned and unconditioned space, between inside and outside (roughly speaking). Wood studs in standard wall assembly are a ubiquitous example of thermal bridging – they conduct heat at a much faster rate than the adjacent insulation layers, speeding up heat loss through the wall assembly. The goal in Passive House design and construction is to eliminate thermal bridges and create continuous thermal breaks (ie. insulation, like our EPS). In an ultra-low energy building, no potential thermal bridge can be ignored, especially when dealing with concrete or steel. Neglecting to account for thermal bridges will lead to much more energy use than planned and can lead to comfort and condensation issues.
In this video, Scott describes two special thermal break details designed into the basement at Karuna: 1. around the ejector pit, and 2. through the stem wall and basement slab to separate the wine cellar from conditioned space in the basement.
This photo below shows the notched EPS thermal break in detail, before the surrounding concrete stem wall had been poured.
Foundation Wall and Drainage
Scott describes the basement wall assembly: concrete stem wall, liquid water proof barrier (black), 8″ EPS, and a layer of high density drain board tied into a drain at the toe of the footing.
These photos below show the black drain board and white drain pipe awaiting installation (on left), and the basement wall with EPS layer fully applied across the exterior (right).

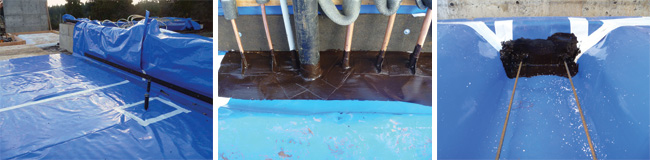
Underslab Foam and Vapor Barrier
After leveling the 3/8-minus compacted gravel to a tolerance of just ¼”, the team sets the underslab EPS foam. The vapor barrier is positioned across the top of the 12″ layer of foam. Avoid the bathtub effect!
These photos below show the blue vapor barrier, taped and sealed. The center and right shots show the careful treatment of pipe and rebar penetrations through the layer, with meticulous application of tape and mastic.
On To Framing!
So now we are on to framing at the Karuna House, and as a company of carpenters, we’re excited! This next phase will require tight tolerances, advanced wall assemblies and custom engineered work, so check back for updates along the way. Until then, Happy New Year!
– Zack
Back to Field Notes