Care with siding preserves beauty while reducing home energy use.
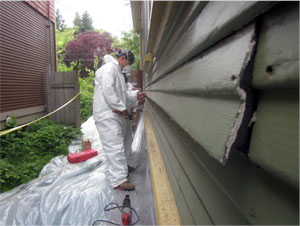 The picture at left shows two insulation specialists carefully removing a piece of 2 lap-drop wood siding (similar to shiplap) in order to install dense-packed cellulose insulation in an exterior wall during a recent energy retrofit by Hammer & Hand.
Siding like this has a lip at the bottom that tends to split if not treated with care, so proper removal usually requires lifting up the piece of siding immediately above to get at the “blind nails” hidden by the overlapping piece (see drawing below) – a delicate operation.
One quicker alternative is to simply drill two-inch holes through the siding at each stud cavity (approximately every 16 inches). After insulating, the holes are plugged with wood, puttied over, and sanded to hide the intrusion. While the approach does get the job of insulation done, weather and sun take their toll on the plugged holes and can lead to blemishes over time.
 We approach our home energy retrofit work with a dual purpose: to reduce energy consumption while preserving the beauty and character of the homes we touch. So when possible we prefer to remove siding rather than to drill-and-plug. We:
- Visually inspect the walls to identify which pieces of siding can withstand the removal process.
- Cut through the paint seal with a razor knife along all the edges of the siding to release the siding from surrounding pieces.
- Locate face nails visually or with a small magnet, and pull them when possible. When pulling is not possible we drive them through using a carpenter’s punch or nail-set.
- After removing face nails we gently pry the bottom edge of the siding loose and away from the wall. We then cut the blind nails using a reciprocating saw with a long metal blade.
- We then gently pry off the siding and insulate each stud cavity.
- When putting the siding back in its place, we layer a new piece of building paper, pieces of step flashing at the vertical joints, and sealants at the edges. This weather-resistive barrier (WRB) keeps bulk moisture from finding its way into the wall assembly.
- After nailing the siding back to the wall, we fill the small holes from the old nails with sealants and wood putty and apply a primer so it is ready for a fresh coat of paint.
By removing the siding this way we can ensure an end-product that looks better and requires less long-term maintenance. Wall insulated, siding preserved.
-Tom Elsass, Home Performance Team
Back to Field Notes