As we insulate structures and make them more airtight we reduce the drying capacity that comes as a byproduct of leaky building envelopes. To avoid increasing the risk of building failure we need to:
- Keep liquid water out of assemblies.
- Keep moisture-laden air out of assemblies.
- Ensure that water molecules can migrate out of assemblies.
In the Pacific Northwest, a lot of our old wood-framed buildings are still standing because they leak a lot of air, inadvertently drying out building envelope assemblies. (These old buildings are also dried out by their big, energy-intensive HVAC systems, but that’s a topic for another day.) Here’s the classic case in our region: it’s a cold, rainy winter day, with some rain penetrating the siding layer of a house, making it wet from the outside. Inside the building it’s hot with people, plants, pets, pasta, and personal hygiene (showers). A plethora of vapor-producing point sources making the building envelope wet from the inside. In old buildings with unmanaged airflow this is usually fine. If we model these buildings with a dynamic hygrothermal tool such as WUFI, we see the moisture content of the wall assembly go up in the winter but fall back down in the summer when it dries out. It creates a nice sine wave where it never gets too wet and it always dries out.
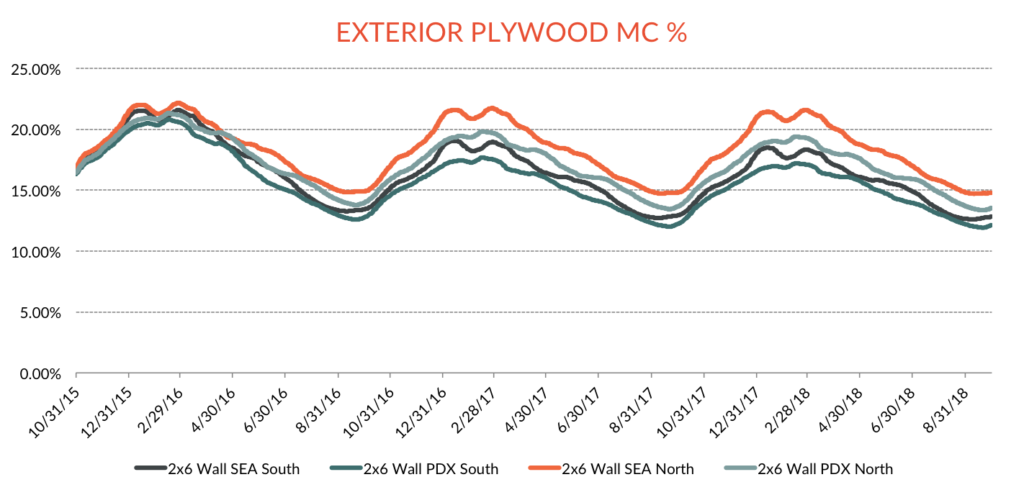
This simulation by Skylar Swinford shows a typical scenario in our climate with wall assembly components getting wet in winter and drying out in summer.
But as we modernize envelope assemblies to increase thermal resistance and reduce air leakage, “natural ventilation” through cracks in the walls drops tremendously. We’re reducing the flow of air to reduce energy movement. We’re reducing the airflow to reduce introduction of moisture into our assemblies. But by doing so we’re also reducing the capacity of the assembly to dry out. Now we as builders are forced to understand what we are doing, or risk water and vapor ruining our day.
The first step in creating a resilient high performance envelope assembly is to keep liquid water from penetrating the assembly. We do this with a continuous water-resistive barrier or WRB that repels liquid water but allows the diffusion of water vapor. Whether this is a membrane, a sheet good like Agepan, or a liquid applied product like Prosoco CAT5, the purpose is the same: keep rain out of the walls. The best strategy is put your WRB behind a ventilated cladding system (aka “rainscreen”) that manages bulk water and provides lots of drying airflow across that surface.
The next step is to keep moisture-laden air out of the envelope, and you do this by creating airtight assemblies with a continuous air barrier. In building science circles we say, “if you control for air you control for moisture and for heat.” That’s because air is a primary conduit for the movement of both moisture and heat. If air can’t move across the assembly then it can’t carry moisture into the assembly. On the other hand, a hole through an envelope the size of a dime under the right conditions can cause a gallon or two of water to condense inside the assembly every day. No joke. Bad thing. This is water being “captured” by the wall as it’s carried by the air leak across the assembly. It starts as vapor and turns to water inside the envelope structure where it’s not supposed to be. Bad things happen. The wrong people make money.
The third step is to ensure that water molecules can migrate out of your envelope. To understand why, we need to understand how vapor drive impacts our assemblies. At any given time, the absolute humidity, or the concentration of water molecules measured in a given amount of air, will be different inside and out. These water molecules are constantly seeking balance, with molecules in higher density wanting to travel to lower density. So, unless they encounter a vapor barrier, water molecules will travel from the high absolute humidity side of a wall, through the wall assembly, to the low absolute humidity side of a wall. No air needs to move to make this happen. It occurs at the molecular level, with individual water molecules diffusing through wall materials.
Now, in a consistently humid place like Houston the smart response to vapor drive is usually to make walls vapor open in one direction (inside to outside) and vapor closed in the other (outside to inside). Simple: keep the humidity in the air outside, outside. But here in the Northwest, indoor and outdoor absolute humidity fluctuate constantly. On rainy days you’ll have high absolute humidity outside setting up a gradient that drives water molecules into buildings. But on dry days that gradient will reverse and the drive shifts to moving water molecules outside. The smart response in our climate is to keep wall assemblies vapor open in both directions so that vapor can diffuse out of assemblies any which way – or, alternatively, ensure that there’s enough insulation outside any vapor impermeable layer to keep that surface warm enough to avoid dangerous levels of moisture.
Here’s the thing to avoid: condensation inside our assemblies. To do that we need to understand relative humidity, or the “humidity” you hear about on the weather report. As Wikipedia will tell you, it’s the ratio of absolute humidity relative to the “maximum” for that temperature. That last part is important: the warmer the air, the more water it can hold. See this chart (from Cerro Tololo Inter-American Observatory):
So, to avoid the formation of condensation inside our wall assemblies we need to ensure that the relative humidity of air inside those assemblies doesn’t reach 100%, known as the dew point, for dangerous lengths of time. (For extra credit, look up “safe storage capacity of materials.”) Because relative humidity is a function of absolute humidity and temperature, we do this by keeping airborne vapor out of our assemblies (through airtight construction), allowing any vapor that does get in to escape (to avoid high absolute humidity), and by keeping the insides of our wall assemblies warm with a nice layer of exterior insulation (to increase the air’s capacity to keep H2O gaseous).
We’re controlling for heat, air, and moisture in our building assemblies. An excellent example and in-depth analysis of this kind of wall assembly is found in BSC’s article BSI-001, a classic by Dr. Joe. Somewhat misleadingly titled “The Perfect Wall.” But his discussion of the principles is spot on. To quote: “If you can’t keep the rain out don’t waste your time on the air. If you can’t keep the air out don’t waste your time on the vapor.”
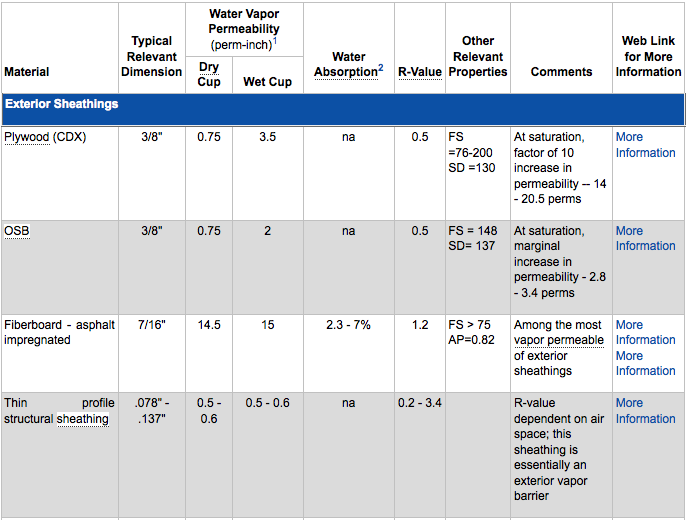
We do that with thermal layers, airtight layers, and vapor permeable layers. Sometimes these layers are combined in one material. Click on the image below to see the excellent Materials Property Table by Building Science Corporation.
Building an envelope assembly is like cooking a dinner. You’ve got a pile of ingredients on the counter (in this metaphor, all the building materials you can choose from) and you want to assemble it into a tasty meal. You’ve got to understand the properties of the ingredients and what they bring to the dish in terms of taste, texture, and nutritional value. The same is true with wall assemblies. We Americans eat a lot of hamburgers because you could probably just live on hamburgers. All the food groups, right? It’s not necessarily the best idea, but it gets the job done and no one dies. (At least not right away.) The same is true of 2×6 construction, siding, plywood, studs with fiberglass batt, and drywall.
But, if you want something that’s high performance and sustainable you have to look carefully at the ingredients and how they come together to produce the desired outcome.
Many lessons are learned the hard way. Ungapped, highly vapor retarded cladding systems such as EIFS were an excellent example of the application of a new technology with inadequate understanding of building science and hygrothermal performance. In many climates these systems failed catastrophically and had to be replaced. Partly due to failures like these, we saw the addition of a drainage plane behind cladding systems in building codes two code cycles ago. This is intended to serve as a way for bulk water to exit the cladding system on the wet side of the building. I assert that it’s also effective because it inadvertently allows some air behind the siding system. This moves it closer to the ventilated siding system (rainscreen) that I alluded to earlier: the holy grail of cladding as it maximizes the drying potential of the exterior surface of the envelope.
So! Know the vapor permeability of the materials you’re using. Put them in the right place. Control for air. Then understand how the envelope will dry out if it gets wet somewhere it shouldn’t.
But if you’ve got bulk water intrusion from the exterior, go straight to jail, do not pass go, and do not collect $200.
P.S. The transfer of vapors is a complex topic – even NASA screwed it up. For more check out BSI: Thermodynamics: It’s Not Rocket Science by Joseph Lstiburek
Top water droplets image by Shelly, found here.
Back to Field Notes