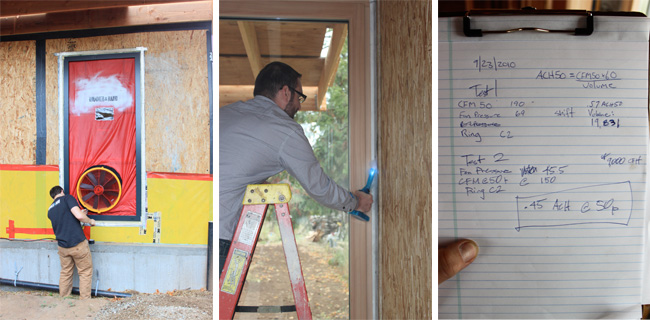
Hammer and Hand’s Sam Hagerman and Skylar Swinford recently headed to Mt. Hood with blower door in tow to perform a preliminary air-tightness test on Root Design Build’s “Shift House”. Here’s Skylar’s post:
Root’s Shift House is on track to achieve Passive House Certification, and we at Hammer and Hand were eager to help a fellow member of the Oregon Passive House community with air-tightness testing.
The moments prior to a building’s first blower door test can be surprisingly tense for a builder and designer, especially when the project is trying to meet the most stringent air-tightness requirements on the face of the earth. Luckily for the Root team, it was quickly evident that they had achieved exceptional levels of air-tightness. Our first blower door test yielded an air leakage rate of 0.57ACH50, besting the 0.6ACH required for PH Certification. While pleased with the results, the folks at Root clearly had higher expectations for their project. The initial results left little room for error. After a quick inspection of the house, Milos’ father and Sam found a 3″ plumbing vent through the roof that had not been sealed prior to the first test (leaving a roughly 7 square-inch opening). Sealing just this one opening improved the overall air tightness of the house by nearly 10%, bringing the air-tightness levels down to an impressive 0.45ACH50 and granting some well-deserved breathing room to the Root team. Congratulations to Root Design Build on a job well done.
While the blower door was running we took the opportunity to inspect the building envelope for potential air leaks. Very few areas needed improvement; however, fog sticks helped track down some small holes that remained. Root redundantly sealed The connection between the windows and the building with multiple tapes and sealants, yet those areas proved to be the most challenging to get a consistently perfect seal, which just illustrates how tricky perfectly sealing the window frame to the building shell can be.
The project employed the use of Passive House-certified, Internorm German windows which were so large that the frames had to be shipped apart from the glazing and then glazing had to be installed on site. Although the windows and doors performed admirably, on-site installation of glazing presented inherent, albeit easily-remedied, air leaks.
In related news, over the next couple of weeks Hammer and Hand will test and document a new installation technique appropriate for Passive House window and door installations using special expanding gaskets from Germany. We hope this window and door installation methodology will transform installation in all types of construction. The new system should install quickly with consistently high levels of performance while maintaining building envelope’s vapor permeability. Stay tuned for results.
Passive House Blower Door Basics:
Bjorn Nelson of Root posted a great description of how a blower door works on the Root Design Build Blog. I will elaborate a bit on how the air-tightness figures are calculated. The first step is to calculate the volume of the house. Typically blower door tests are based on “quick and dirty” volume calculations using the average ceiling height multiplied by exterior dimension. This method leads to overly optimistic air-tightness test results that cannot accurately be compared to those of a Passive House. The proper way to calculate volume for a Passive House air-tightness test is similar to the method used to calculate “Treated Floor Area”; however, it is vital that ALL air in the interior space is counted as 100%. This includes air in mechanical rooms, stair wells, storage areas, and conditioned attic spaces. The volume of interior walls and floors must be subtracted from total volume, even if they contain no sound insulation. Once the volume is calculated, a calibrated blower door is required to depressurize the house to -50 Pascals (a standard measure of pressure similar to psi or pounds per square inch) and measure the air leakage through the building envelope in cubic feet per minute (CFM). From these two figures, Air Change per Hour (ACH) at a pressure of -50Pa can be calculated (see formula below). Air changes per hour (ACH) is a measure of how many times all the air in a home will be completely replaced in an hour in natural conditions. In natural conditions, with no equipment running, no strong winds and no huge temperature differentials the natural differential in Pascals between inside and outside is -1Pa to -4Pa. If a house has one air change per hour, it means that the current air in the house will be completely replaced by new air from the outside in a one-hour period.
-Skylar
 Back to Field Notes